Compression strips away some data from the original file in order to minimize the file size. This difference in quality is usually noticeable.
Some micro-nuances and details are loss and instruments have a slightly softer attack due to compression.

Current Methods and why they don't work
Since Apple Music does not have a native Linux client, most of us would use Apple Music Web or Cider. Unfortunately, the web version of Apple Music does not support loseless. The same could be said for Cider, it is pretty much a wrapper of Apple Music Web.
Another method is to use an Android emulator or a Windows virtual machine. The problem with this is that it is very resource-intensive and messy to setup. To make things worse, the android emulator from Android Studio has a noticeable hissing sound in the background when playing music.
The Solution
We can use Waydroid. Not only is it very light due to its container-based approach, it also does not have a hissing sound in the background.
Before we get started, let's change the supported sampling rates of Pipewire.
1) Check if you're using Pulseaudio or Pipewire:
pactl info | grep "Server Name"
The output should mention Pipewire and look similar to this:
Server Name: PulseAudio (on PipeWire 1.0.0)
If the output doesn't mention Pipewire, switch to Pipewire.
2) Copy pipewire config files to home directory
cp /usr/share/pipewire ~/.config/pipewire
3) Replace default.clock.rate and default.clock.allowed-rates in pipewire.conf with the following values:
default.clock.rate = 44100
default.clock.allowed-rates = [ 44100 48000 88200 96000 176400 192000 352800 384000 ]
4) Restart Pipewire service
systemctl restart --user pipewire.service
systemctl restart --user pipewire-pulse.service
Waydroid Installation
The method of installing will differ from distro to distro. Read the docs here. I will be showing how I installed waydroid in Arch Linux.
Pre-requisites
- Intel or AMD GPU. If using an Nvidia GPU, you can use integrated graphics if your CPU supports it. If not, you can still use Software rendering. However, when I tried software rendering, my PC was laggy while playing music. (Was running a Ryzen 5 3600 and GTX 1070 so your mileage may vary) Avoid using software rendering as much as possible.
- (Optional) Use Wayland instead of Xorg. If using Xorg, take a look at https://github.com/waydroid/waydroid/issues/195.
(For Arch Users Only) Installation Instructions
You do not need to switch to Linux-Zen kernel or recompile your Linux kernel.
Scroll to 1.4.2 DKMS modules of the Arch Wiki.
- Install
binder_linux-dkmsfrom the AUR and load the kernel modulebinder_linux. - Install
waydroidfrom the AUR.
Configuring Waydroid
- Once waydroid is installed, you are given an option to initialize it with or without Google Apps installed. I personally prefer without so I ran this command:
waydroid init
OR If you want to have Google Apps pre-installed, run this:
waydroid init -s GAPPS
- Enable the
waydroid-container.service
sudo systemctl enable --now waydroid-container.service
- Launch Waydroid
waydroid show-full-ui
- Install Apple Music
If you have Google Apps pre-installed, download Apple Music from the Play Store.
If not, download the lastest Apple Music apk from APKPure or a similar site. After that, run:
waydroid app install $path_to_apple_music_apk
Media Controls Workaround
Since waydroid doesn't support MPRIS, we can not play, pause, or skip music using our keyboard. We can only do it by switching back to waydroid and controlling music through Apple Music itself.
- The workaround I thought of is to use KDE Connect. Install KDE Connect in your desktop and waydroid emulator. After the installation, connect both devices by opening the KDE Connect app in your waydroid emulator. A prompt will appear and ask you to connect both devices.
- Open the KDE Connect app in your waydroid emulator and click on the (...) icon on the top-right corner to go to settings. and enable
Media Player ControlandMultimedia controls.

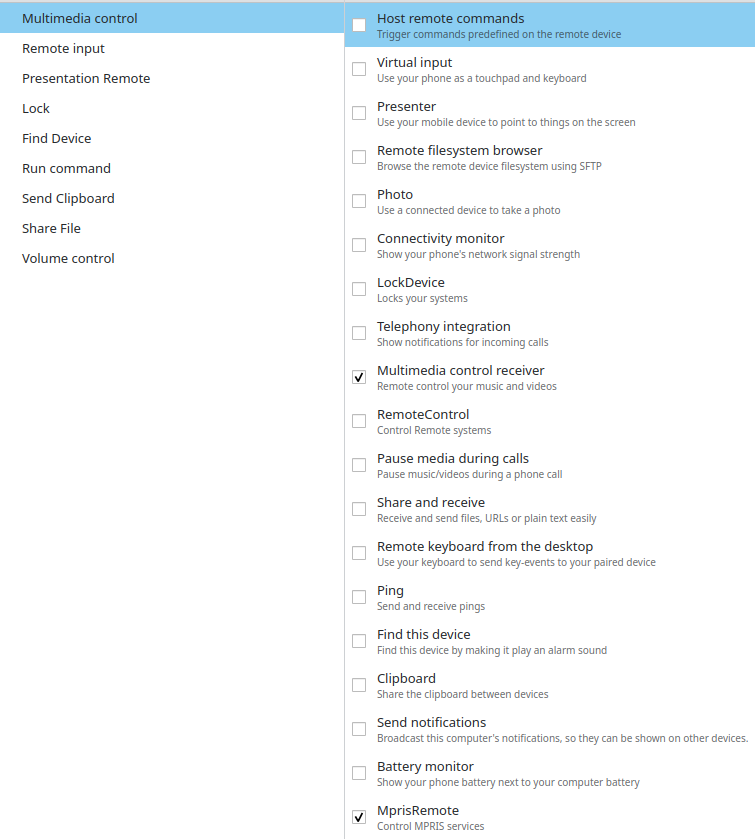
- Open the KDE Connect app in your desktop and enable
Multimedia control receiverandMprisRemote.
Once you've done all the steps, enjoy!
]]>Robotics is a fascinating field that combines electronics, mechanics, and programming to create intelligent machines. Most of these machines are used to automate repetitive tasks such as factory assembly and crop harvesting.
One of the best ways to start learning robotics is by creating projects that you're interested in. I highly suggest starting with an Arduino board. You can think of an Arduino board as the "brain" of the robot. You can instruct it to perform various tasks.
Before heading on to the next section, take a look at some projects that you might be interested in.
Now that you have a few projects in mind, we need to plan how we're going to build each project. Think of a project that you're most interested in and let's start from there.
Materials
To build the project, you will need to have the materials required to build it. Most of these materials are must-have common electronic components. It's usually best to buy those sold as a kit to save your time and money. The kits contain the very common components and are generally cheaper than buying these components individually. Since you're just starting out, I recommend only buying the items marked with (Must Have). The total cost should be around $50 or less.
Board Kit (Must Have)
- This kit contains the Arduino Uno board, a breadboard, some wires, resistors, and small led lights.
Shopee PH: https://shopee.ph/wenkai.ph/4057448834
Amazon: https://www.amazon.com/ELEGOO-Starter-Tutorial-Compatible-Official/dp/B01DGD2GAO
AliExpress: https://www.aliexpress.com/item/1005004904450418.html
Sensor Kit (Must Have)
- This kit contains common sensors that the you will connect to the Arduino board. Some common sensors are temperature sensors, distance sensors, and PIR sensors (often used for human motion detection).
Shopee PH: https://shopee.ph/product/201062777/6512894960
Amazon: https://www.amazon.com/kuman-K5-USFor-Raspberry-Projects-Tutorials/dp/B016D5L5KE/
AliExpress: https://www.aliexpress.com/item/33010384013.html
Electronic Tools
- Robotics will require you to tinker with electronics a lot which means it is essential to have the right tools for the job
Multimeter (Must Have)
A multimeter can measure voltage, resistance, current, and many more things. This is a must have.
Refrain from buying cheap multimeters because it's not safe especially when you're working with mains voltage
If you're not going to work with mains voltage (110V or 240V), I suggest starting with the Zotek ZT111 or Aneng AN8008 multimeter. See other alternatives here.
If you're going to work with mains voltage, you will have to spend a lot more. I recommend buying the fluke multimeters.
Soldering Station and Accessories
You will eventually need to solder in some of your projects. At some point, you will have to build a permanent circuit or encounter an electronic component that doesn't come with header pins, requiring you to solder them in place. To start soldering, you would need a (soldering station or soldering iron) and a solder lead. The rest of the materials are optional
Soldering Station or Portable Soldering Iron
Refrain from buying dirt-cheap soldering irons. These $1-2 soldering irons easily break and are safety hazards
Solder Lead
Try to get the lead-free solder lead since it's fumes are less poisonous.
Helping Hands
These are quite useful. They can hold the components you want to solder in place.
Other optional accessories: Solder holder, solder vacuum pump, solder wick, solder flux, cleaning sponge, etc.
Some other tools
These tools are optional. Only buy them when you need them:
- Wire Stripper
- Wire Cutter
- Screwdrivers and screws
- Bench Power supply
- Pliers
- Hot glue gun
- 3D Printer
- Oscilloscope
Other Electronic Components
Some projects will need to have more components than the ones provided by the arduino kits. I'll list some of the components that you might need:
- RFID Reader + RFID Cards
- Buck Converter (Voltage Step down converter)
- Boost Converter (Voltage Step up converter)
- Diodes
- Mosfets or Transistors
- Perfboards
- Relays
- Servo Motors or DC Motors or Stepper Motors
- LCD Displays
- Solenoid Lock
- Bluetooth or RF module (Receiver and Transceiver)
- Water pump
- NodeMCU / Raspberry Pi
Electronics Knowledge
It's alright if you don't have a lot of electrical knowledge. In fact, most people start out with very basic knowledge about electricity. You could start with just an understanding of voltage, resistance, and current as well as knowledge of series and parallel circuits. If you don't understand any of these, check these videos out:
Diving Deeper
Once you've got enough knowledge about electricity, let's understand how an essential component – a breadboard – works by watching this video:
There are a few more resources that you might want to take a look at:
Simple Projects
All these knowledge gained is useless unless you know how to apply them. Let's start with simple projects and progress from there. I recommend reading these project handbooks and start with the led circuits:
Other Resources
These are other great resources that can help you get started:
- You can learn Arduino in 15 minutes
- A tour of the arduino uno board
- Arduino Course for Beginners (FreeCodeCamp)
Youtube Channels
Social Media (Ask help/advice from here)
]]>Hosting a web server might be daunting at first; however, it isn't as complicated as you would think. To get started, you actually don't have to manage physical servers yourself. We could use a cloud provider to do it for us. In our case, we will be using AWS, a cloud provider managed by Amazon.
Behind the Scenes
Let's start by understanding how web hosting works. To do so, I highly recommend reading this AWS resource and watching the video below:
Creating an AWS Account
For part 1, we will be setting up the server. For part 2, we will do additional server setup and use Cloudflare as our DNS and CDN to route requests from our domain to our server.
We will be using an AWS service called EC2 . It allows you to provision virtual machines called instances. To simplify things, you can imagine that a virtual machine is like a computer that has its compute resources set in advanced. (Its storage, memory, and amount of cpu cores are configured). Virtual machines enable you to split a powerful computer and turn it into many small computers by dividing its compute resources.
Instances come in many types and sizes. (Learn more about them here.) The one we will be using is a t2.micro or t3.micro instance. Let's start by creating an AWS account. Take Note: They will ask you for your credit or debit card details. Luckily, using a virtual card could sometimes work. If you're from the Philippines, you can easily create and use GCash or PayMaya's virtual cards for free.
Visit the AWS website and click on the "Get Started for Free" or "Create an AWS Account" button.

While creating your account, I highly recommend following this video tutorial:
Creating the EC2 Instance
Once you've created your account, head on over to the AWS Console.
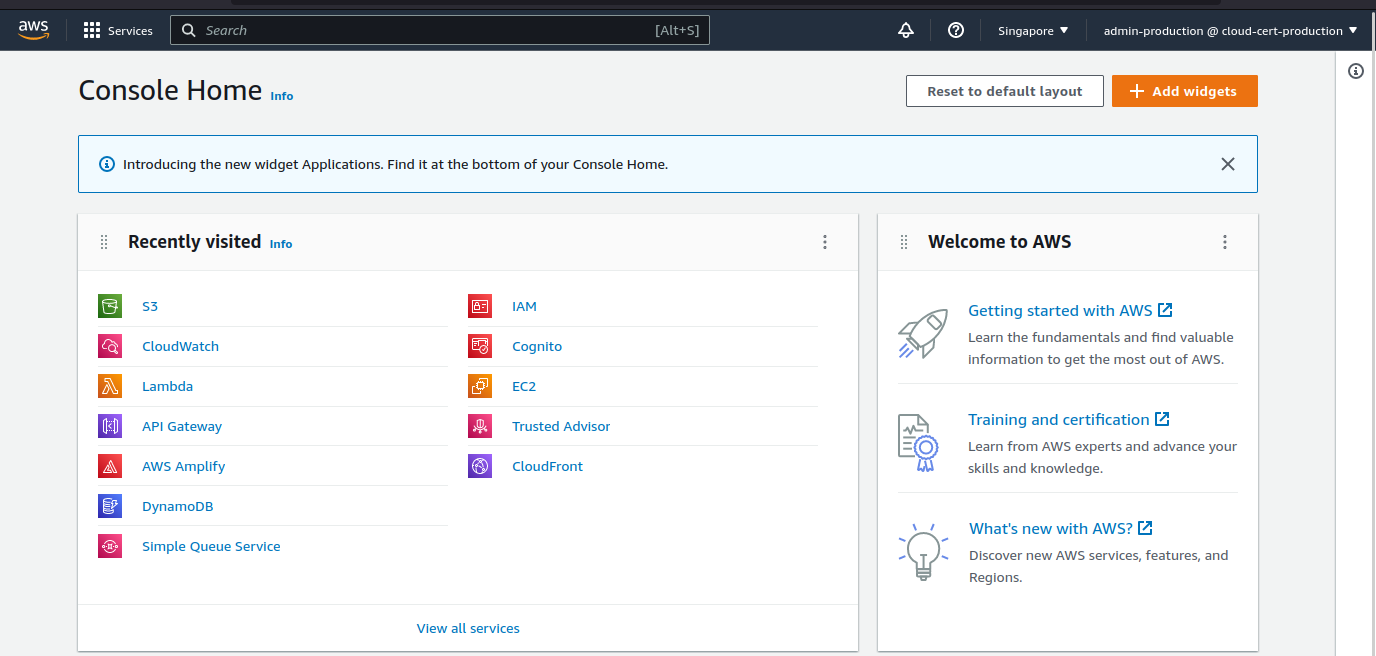
Click on the search box above and search for EC2.
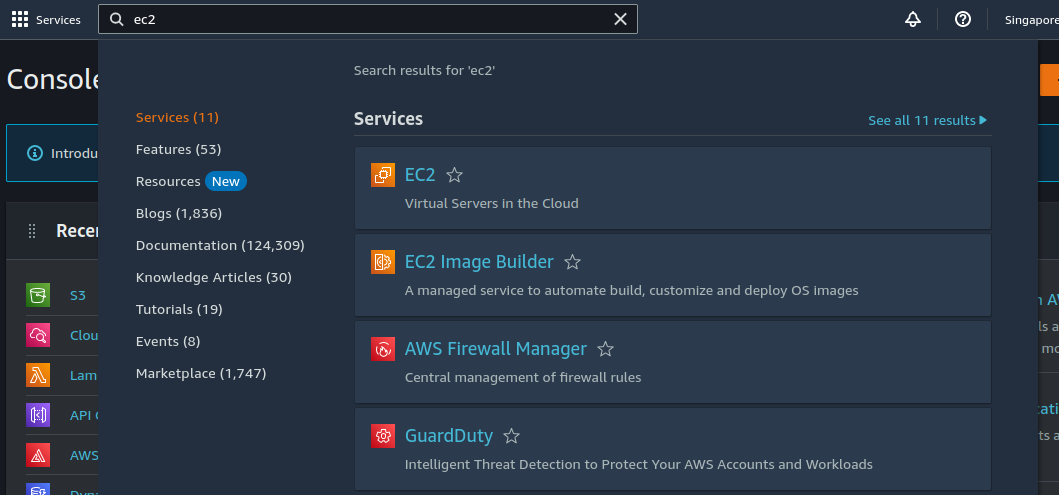
Click on the EC2 link and you'll be greeted by the EC2 console.
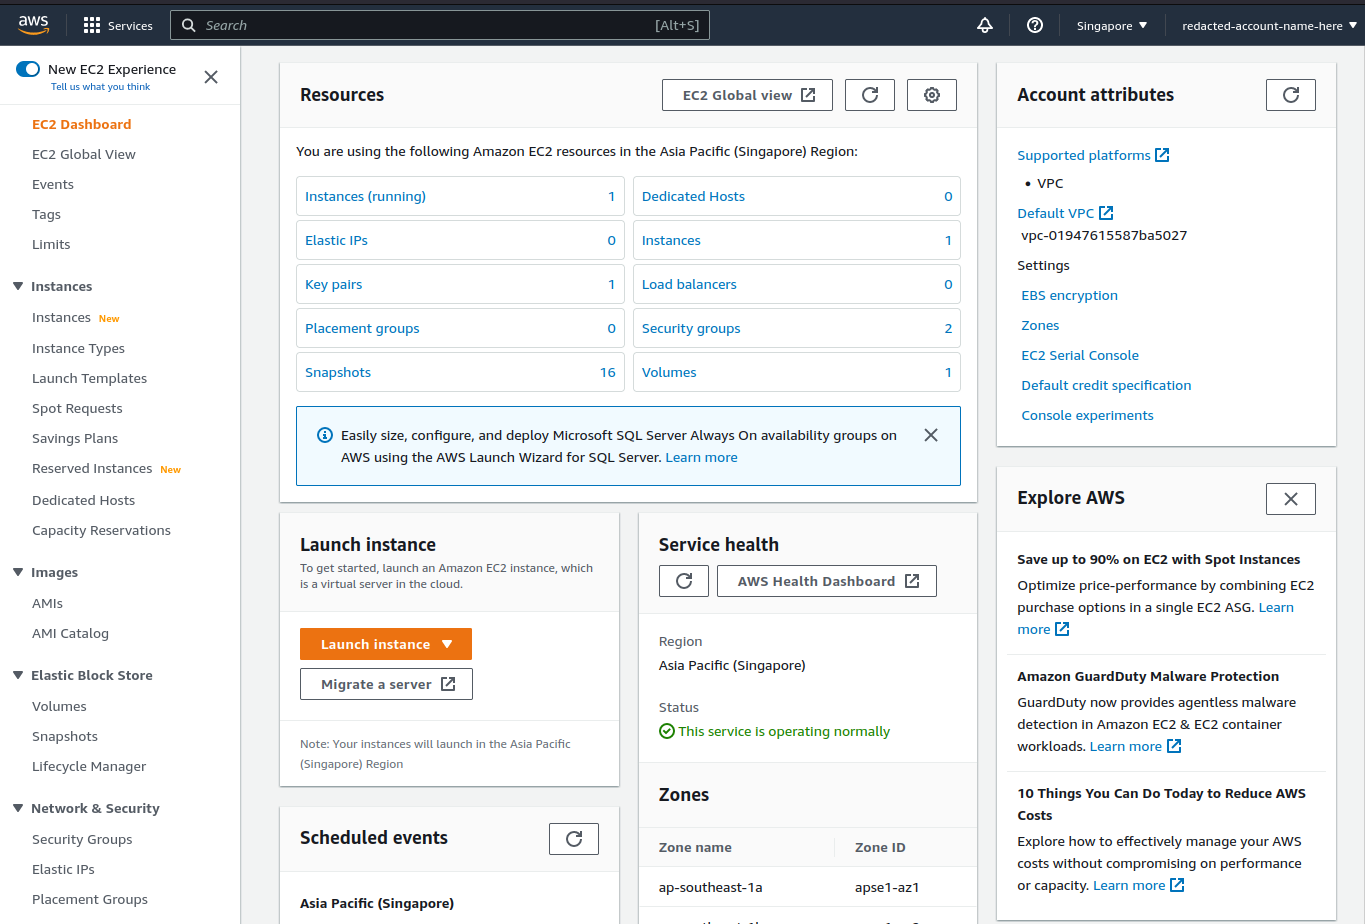
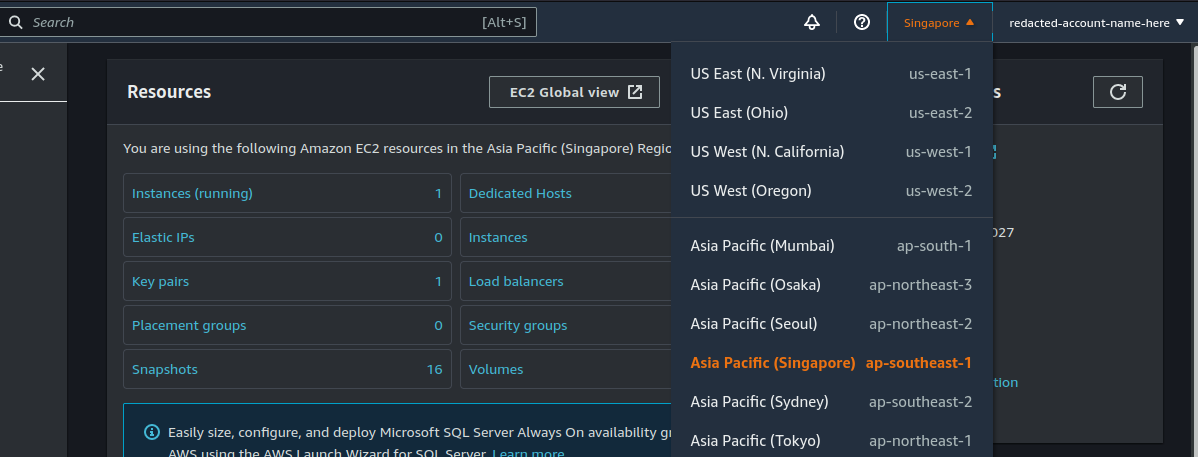
Before creating an EC2 instance, let's set the region where we want to create the instance in. We want to create the instance at the region that's closest to you to reduce latency. You can change the region by clicking on the country dropdown on the top-right side of the page.
To create an EC2 instance, click on the "Instances" text at the left sidebar.
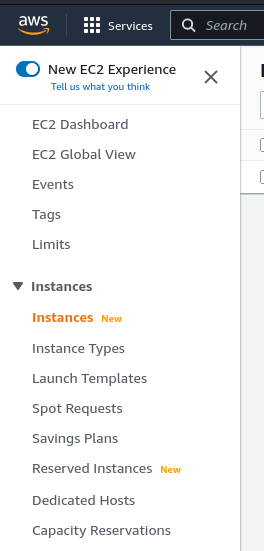
After that, click on the "Launch instances" button at the top-right side of the dashboard.
Once you're in the launch instance page, set name of the instance (You can choose any name). Under "Application and OS Images (Amazon Machine Image)", select Ubuntu as your operating system.
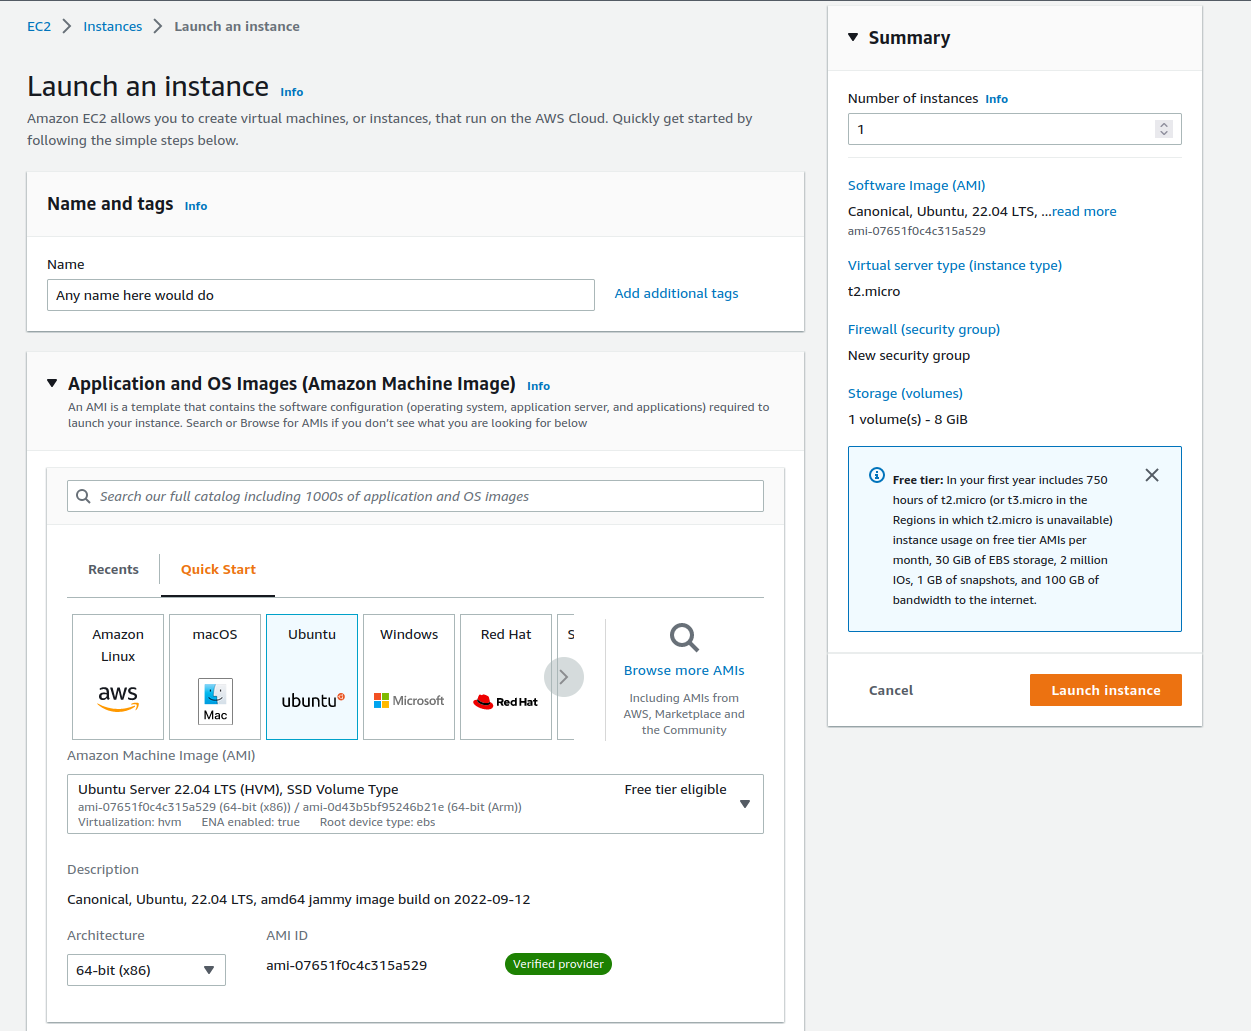
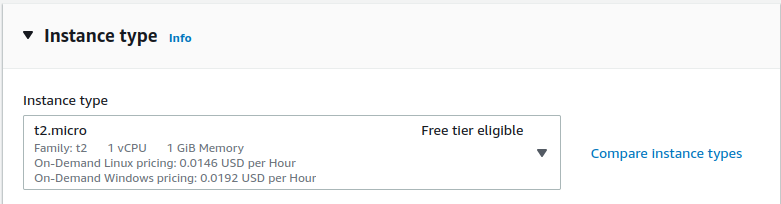
Scroll down and select a "Free Tier Eligible" instance type. To be safe, make sure that t2.micro is selected. (Side note: The free tier allows you have t2.micro instances running for 750 hours per month. If you only have one instance running, the free tier has you covered.)
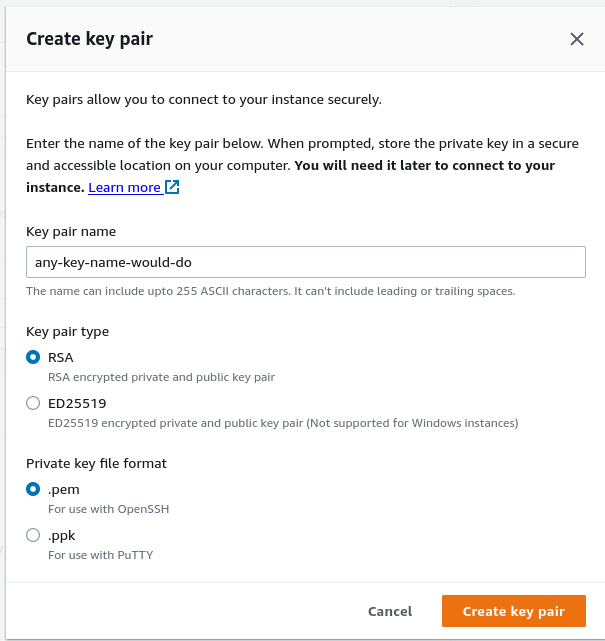
To connect to your EC2 instance, you need to generate a key pair. Think of it as a password that you use to authenticate to the server. Click on "Create new key pair" to generate a new one.
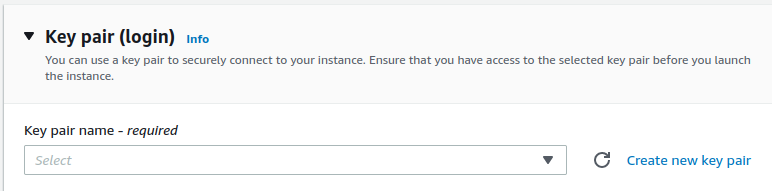
Set the key pair name and click on "Create Key pair". The key pair, a .pem file, will be downloaded. Make sure to not to lose it. In my case, I'm storing the key file in my Documents folder.
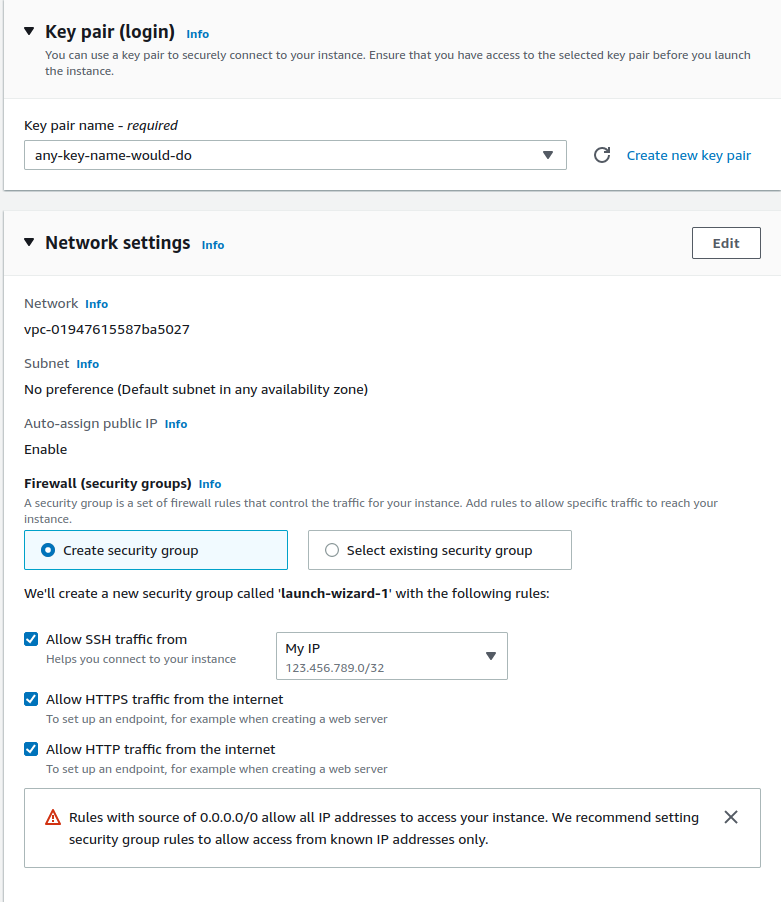
Select the new key pair name. In Network settings, allow ssh traffic from your IP only. Click on the "Anywhere" dropdown and select "My IP".
Take Note: If you're using a residential network, your IP address constantly changes after some time. You would have to reconfigure the security group to allow connections from your new IP address. The steps to do this will be at the bottom of this article.
After allowing traffic from your IP only, allow HTTPS and HTTP traffic from the internet.
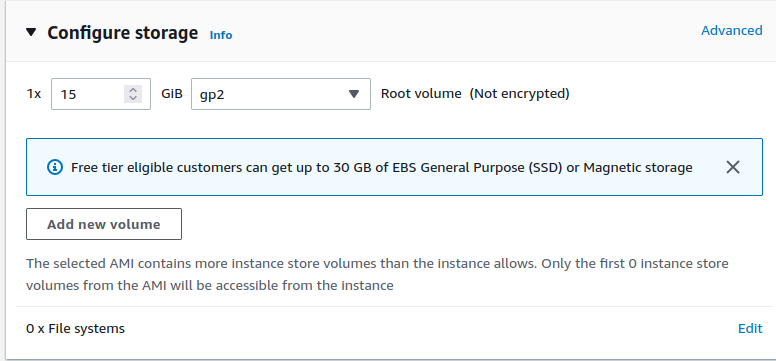
The last thing we have to do is configure storage settings. To stay within the free tier, EBS allows you to use up to 30 GB of storage. In this tutorial, let's attach a 15 GB storage. If more storage is needed, we can always attach more block devices.
Once you're done, review the details and launch the instance.
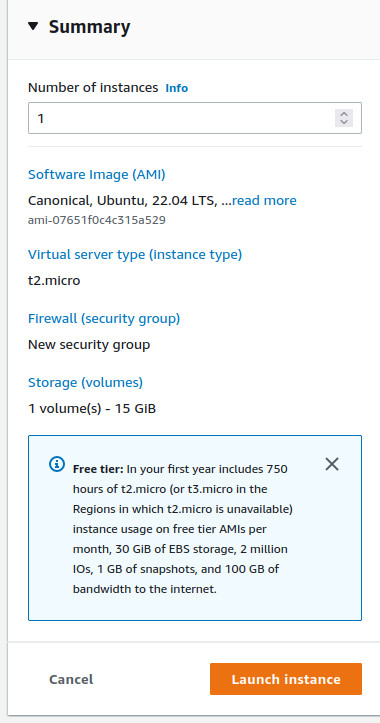
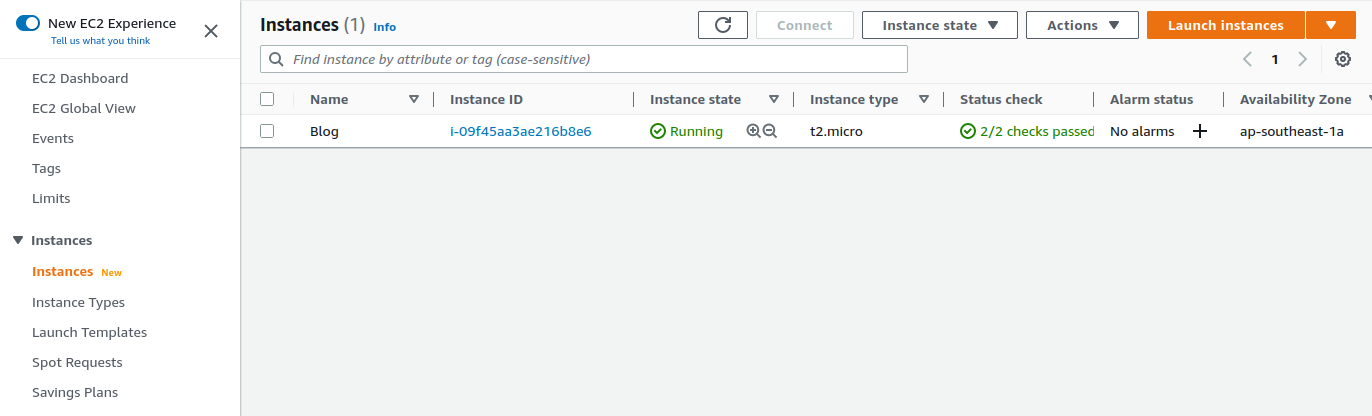
Once the instance has successfully launched, you should see the following screen. Click on "View all instances".
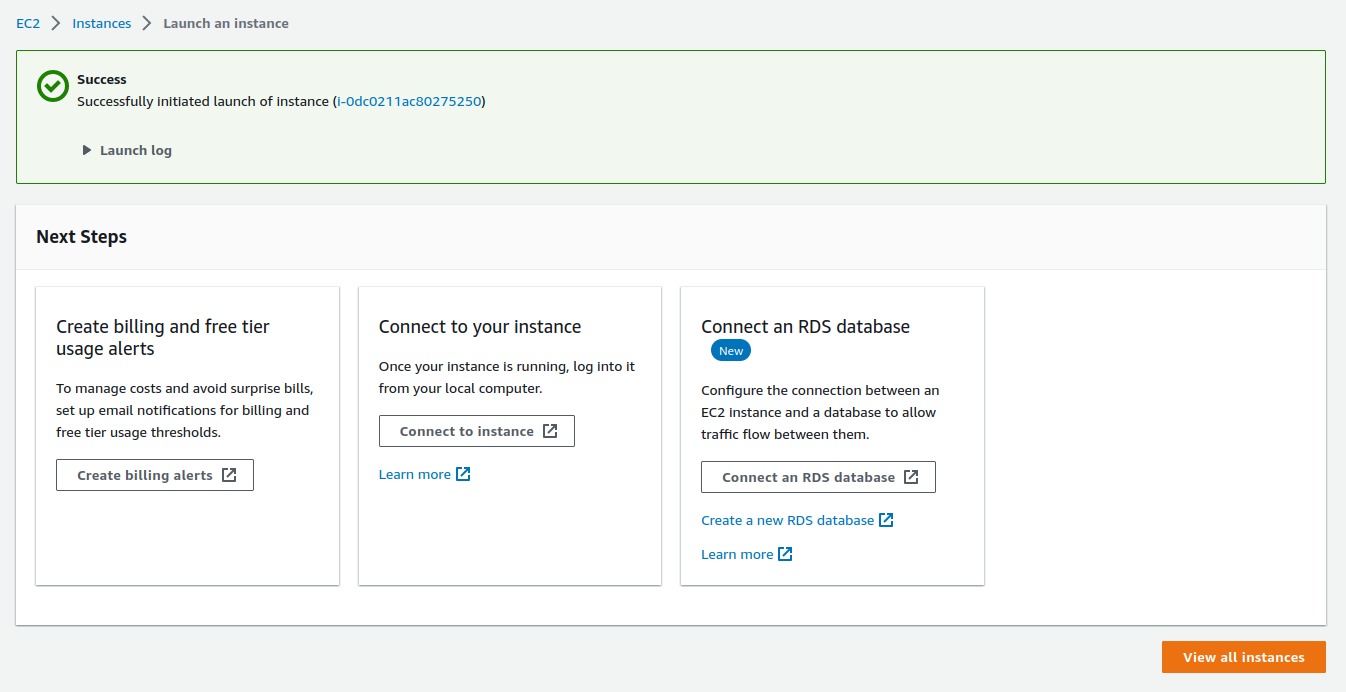
You will see your instance being provisioned. It will take a few minutes for it to be available. Once the Instance State is Running and the Status check has 2/2 checks passed, the instance is ready for use.

Connecting to the EC2 Instance
To connect to an EC2 instance, we have to use a communication protocol called SSH. If you'd like to learn more about SSH, I highly recommend watching this video.
Let's start connecting to the the EC2 instance. Select the instance you've created by clicking on the checkbox and click on the "Connect" button on the top-right corner.

Select "SSH client" and you will see a few instructions on how to connect to the instance.

If all of this is new to you, I recommend learning how to use the change directory (cd command) first through the following video (The cd command works in Windows, MacOS, and Linux.) We will be using the cd command to reference the .pem key file you've downloaded a while ago.
The steps that you have to follow to ssh to your server depends on your operating system. I recommend watching the following tutorials depending on your OS.
Windows
MacOS or Linux
Follow the instructions in the video above for Windows, but for Mac and Linux computers, you have to run the follwing commands in the terminal:
chmod 400 ~/Documents/replace_with_your_key_file_name.pem
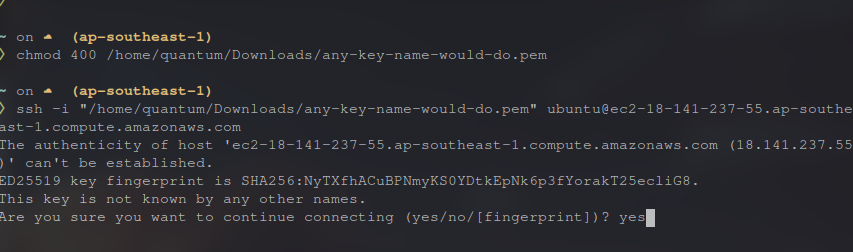
ssh -i "~/Documents/replace_with_your_key_file_name.pem" ubuntu@ec2-18-141-237-55.ap-southeast-1.compute.amazonaws.comTake Note: In the commands above replace ~/Documents/replace_with_your_key_file_name.pem with the directory you've stored your key file in. Also replace ec2-18-141-237-55.ap-southeast-1.compute.amazonaws.com with your instance Public DNS. The public DNS can be found in #4 of connect instance page.

Once you've entered the commands, you will be asked if you want to connect to the instance. Type yes and hit enter.
You will then be greeted by the following page.
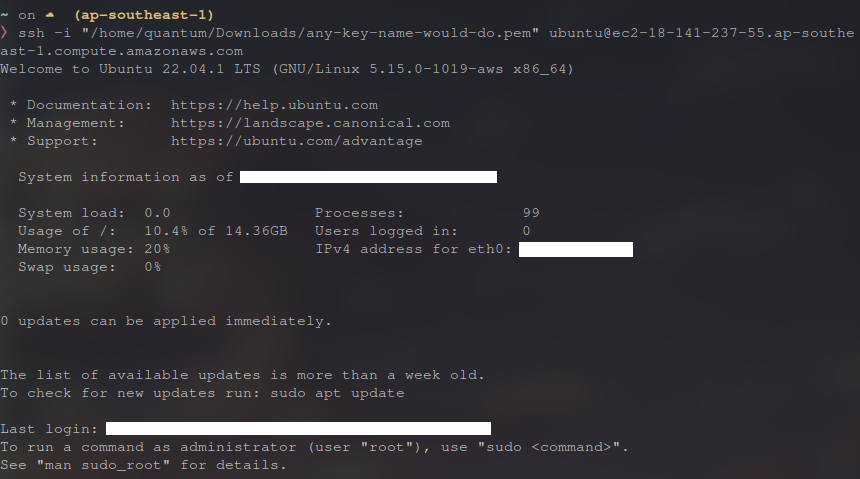
Take Note: You will be managing the server through the CLI by typing commands. There is no GUI because having a GUI displayed to you consumes server compute resources. Although the 1GB ram and 1vCPU core of the t2.micro instance is enough for serving low to medium web traffic, having a GUI displayed will take almost all the resources, leaving little to no resources for serving web traffic.
Securing the EC2 Instance
Securing your EC2 instance is very important. We have to update the Ubuntu server to its latest version first.
sudo apt update && sudo apt upgradeAnother thing we have to do is to ban malicious entities trying to bruteforce their way in to the server. We can use CrowdSec to do so. Let's install CrowdSec by typing the following commands:
curl -s https://packagecloud.io/install/repositories/crowdsec/crowdsec/script.deb.sh | sudo bash
sudo apt install crowdsec
sudo apt install crowdsec-firewall-bouncer-iptables
Once it's installed, we have to start CrowdSec using the following command:
sudo systemctl enable --now crowdsec.serviceOptional: If you'd like to further secure your server, I highly recommend reading the following article. I also recommend changing your SSH port from 22 to something else and don't forget to go to your inbound rules (see below in conclusion) and change the Type from SSH to Custom TCP as well as change port 22 to the port you've set.
Conclusion
That's it for part 1. I hope you were able to easily create your own EC2 instance. In part 2, we will be setting up our server to serve requests from the internet.
Take Note: After some time, there is a chance that you won't be able to connect to your server through ssh. (Your ssh command will timeout) It's because your public IP address changes from time to time if you're using a residential network. If this happens, try the following:
In the EC2 console, under "Network and Security", click on Security groups. Select the security group of your EC2 instance.
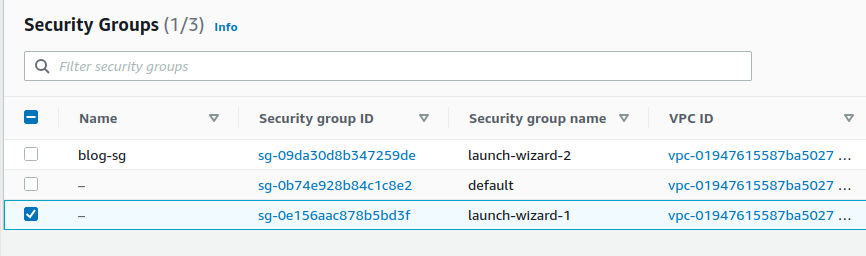
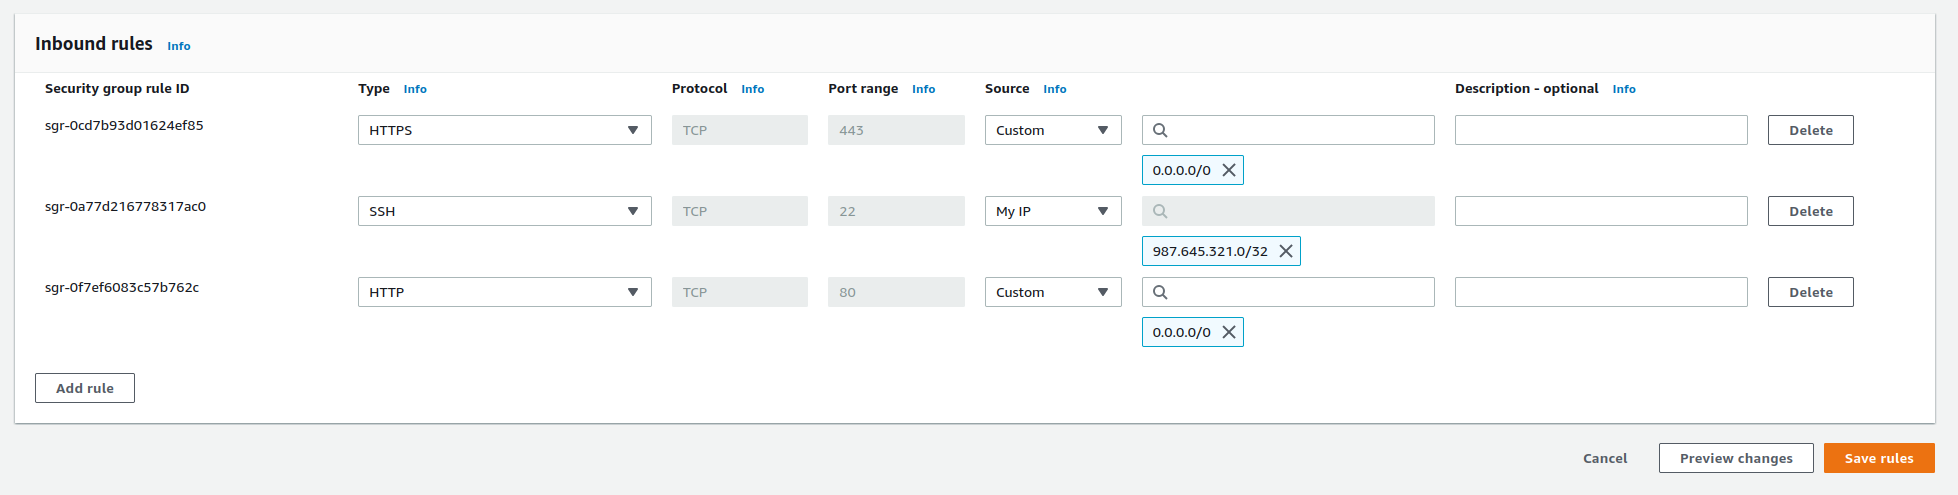
On the dashboard below, select "Inbound rules" and select the rule with the "Port Range" 22 then click on "Edit inbound rules".
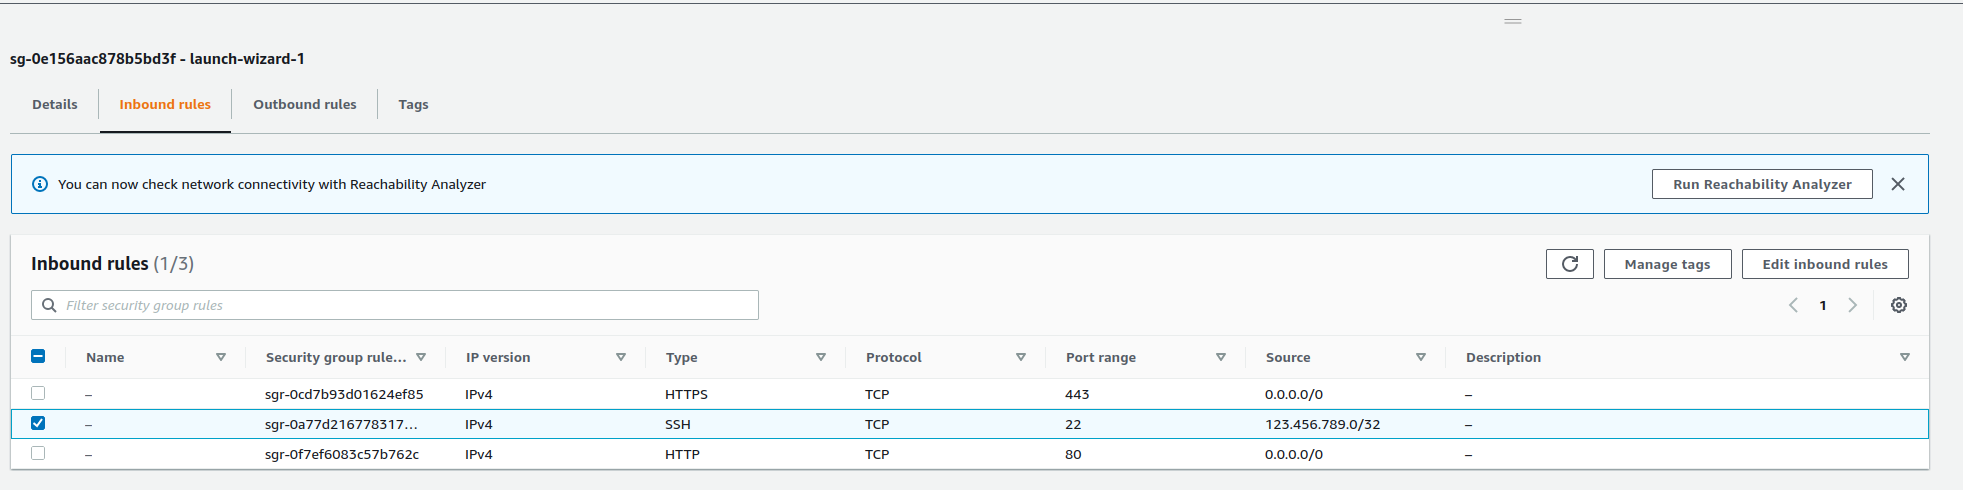
Remove your current IP address by clicking on the "X" button beside your IP address (123.456.789.0/32 in my case) and add your IP by clicking on "Custom" then select "My IP". After that, click "Save rules".
Computer vision is a subset of artificial intelligence that enables computers to extract meaningful information from visual data (images and videos). Convolutional Neural Networks CNNs Convolutional neural networks mainly consists of three types of layers — input layer, hidden layer, and output layer.
The input layer is the first layer of a CNN. It contains the input data. In a simple image recognition model, the input is usually the RGB values of each pixel of an image.
The middle layer of a CNN consists of many hidden layers connected to each other. Hidden layers transform data by applying complex mathematical functions. Once the data is transformed, the hidden layer passes the transformed data to the next hidden layer for further processing.
Once there are no more hidden layers, the transformed data is passed to the output layer. The output layer contains the produced output data. In a simple cat vs dog image recognition model, the output is the probability of the image containing a dog vs a cat.
If you'd like to learn more about how neural networks work, I highly recommend watching the video below:
Choosing a Deep Learning Framework
There are many deep learning frameworks to get started with Computer Vision. Mainly Tensorflow, PyTorch, Caffe, and many more. These deep learning frameworks are a good way to get started, but it's very hard for a beginner to produce image recognition models that have higher than 90% accuracy using these frameworks because they require you to have a solid understanding of computer vision. This is why I highly recommend starting with the fast.ai library. Unlike most deep learning frameworks, fast.ai simplifies a lot of things for you. Such examples would be the implementation details of transfer learning and image augmentation. These could be easily implemented with a few lines of code when using the fast.ai library.
Development Setup
There are two ways to get set up the fast.ai environment.
(Recommended) The first way is to use a cloud environment that provides you with a free GPU. I highly recommend PaperSpace. To get started, Create an account.
Once you've created your account, create a notebook:
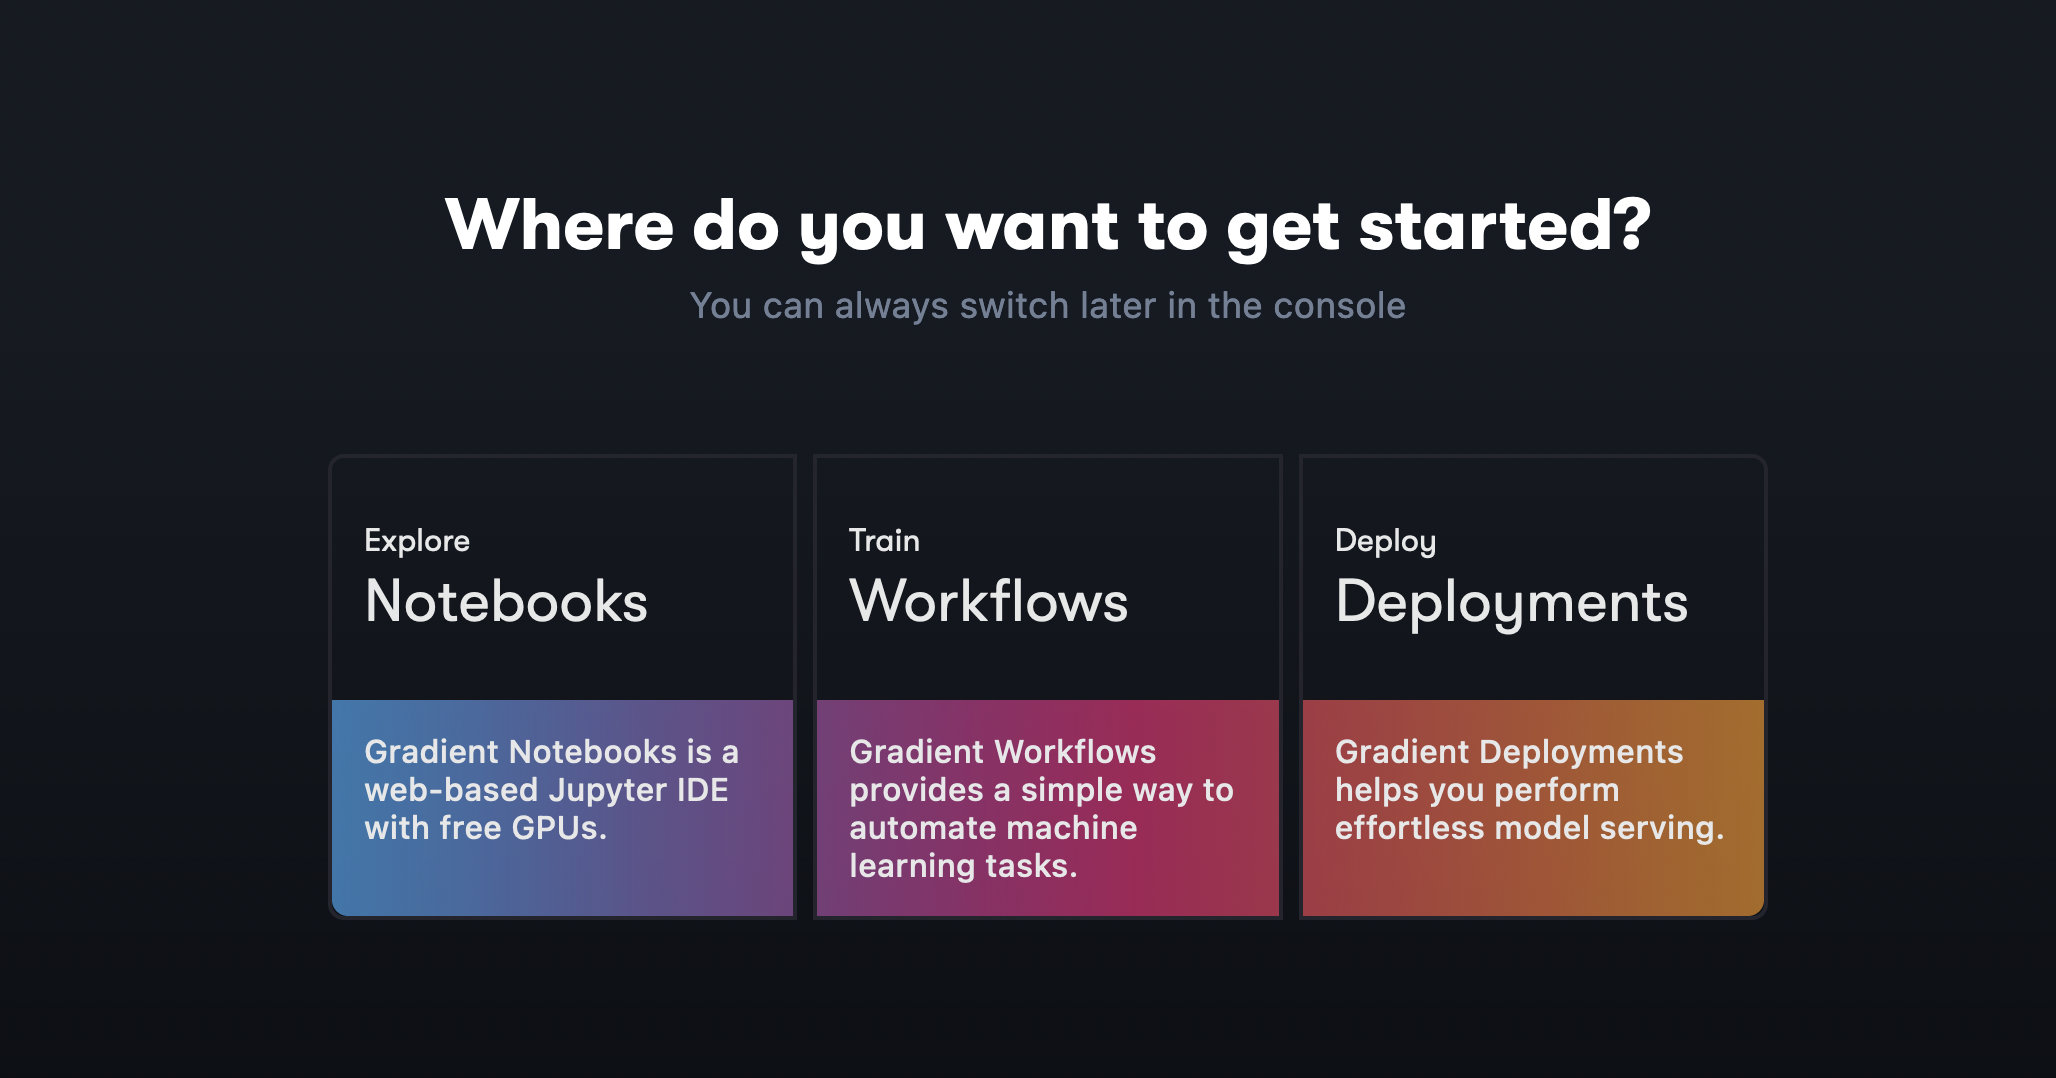
Click on the "Create" button.
Select the "fast.ai" card.

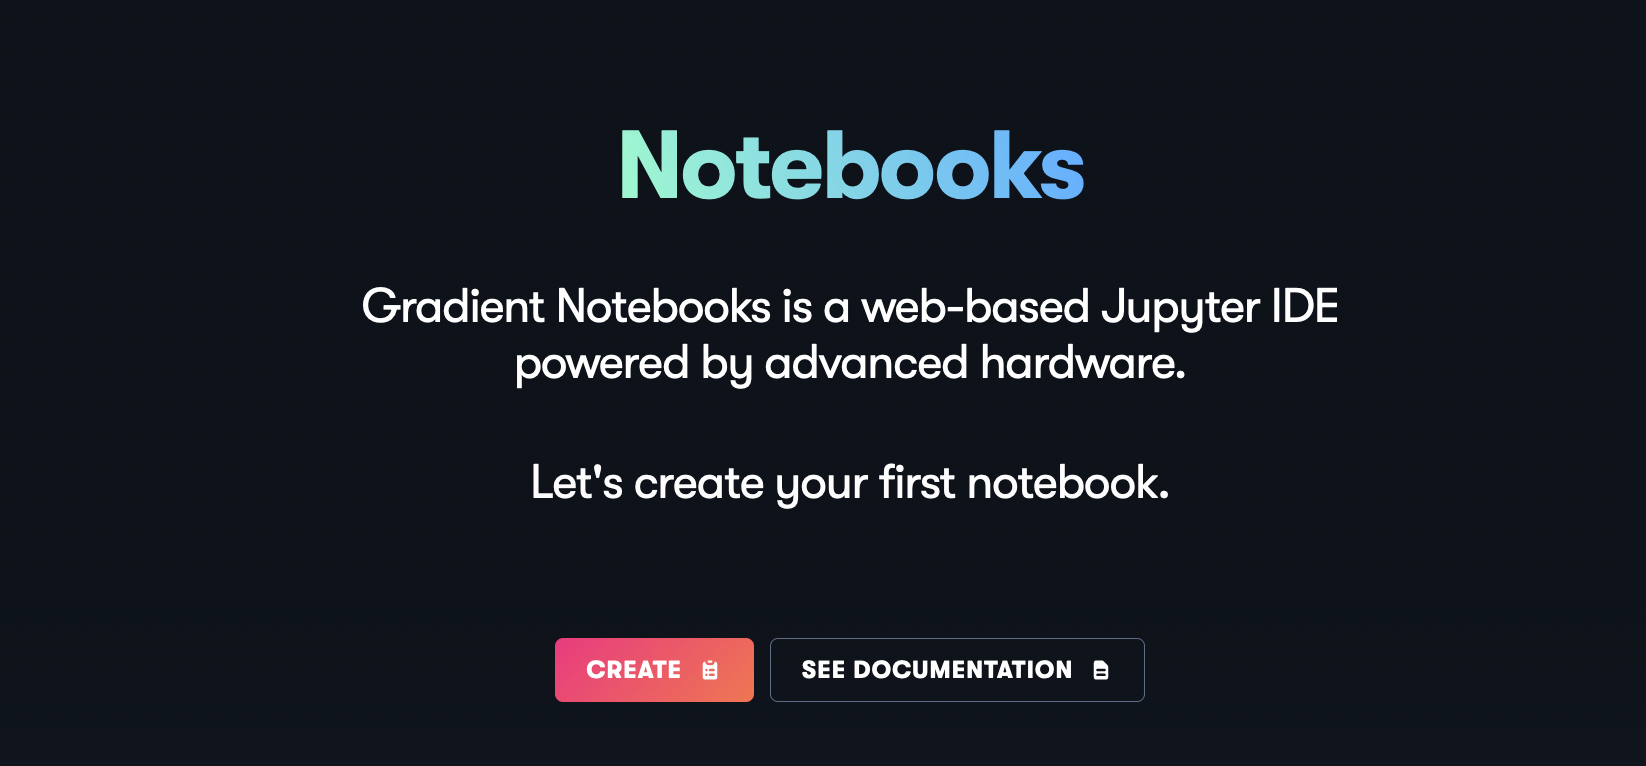
Make sure you have "Free GPU" as your machine selected and click "Start Notebook".
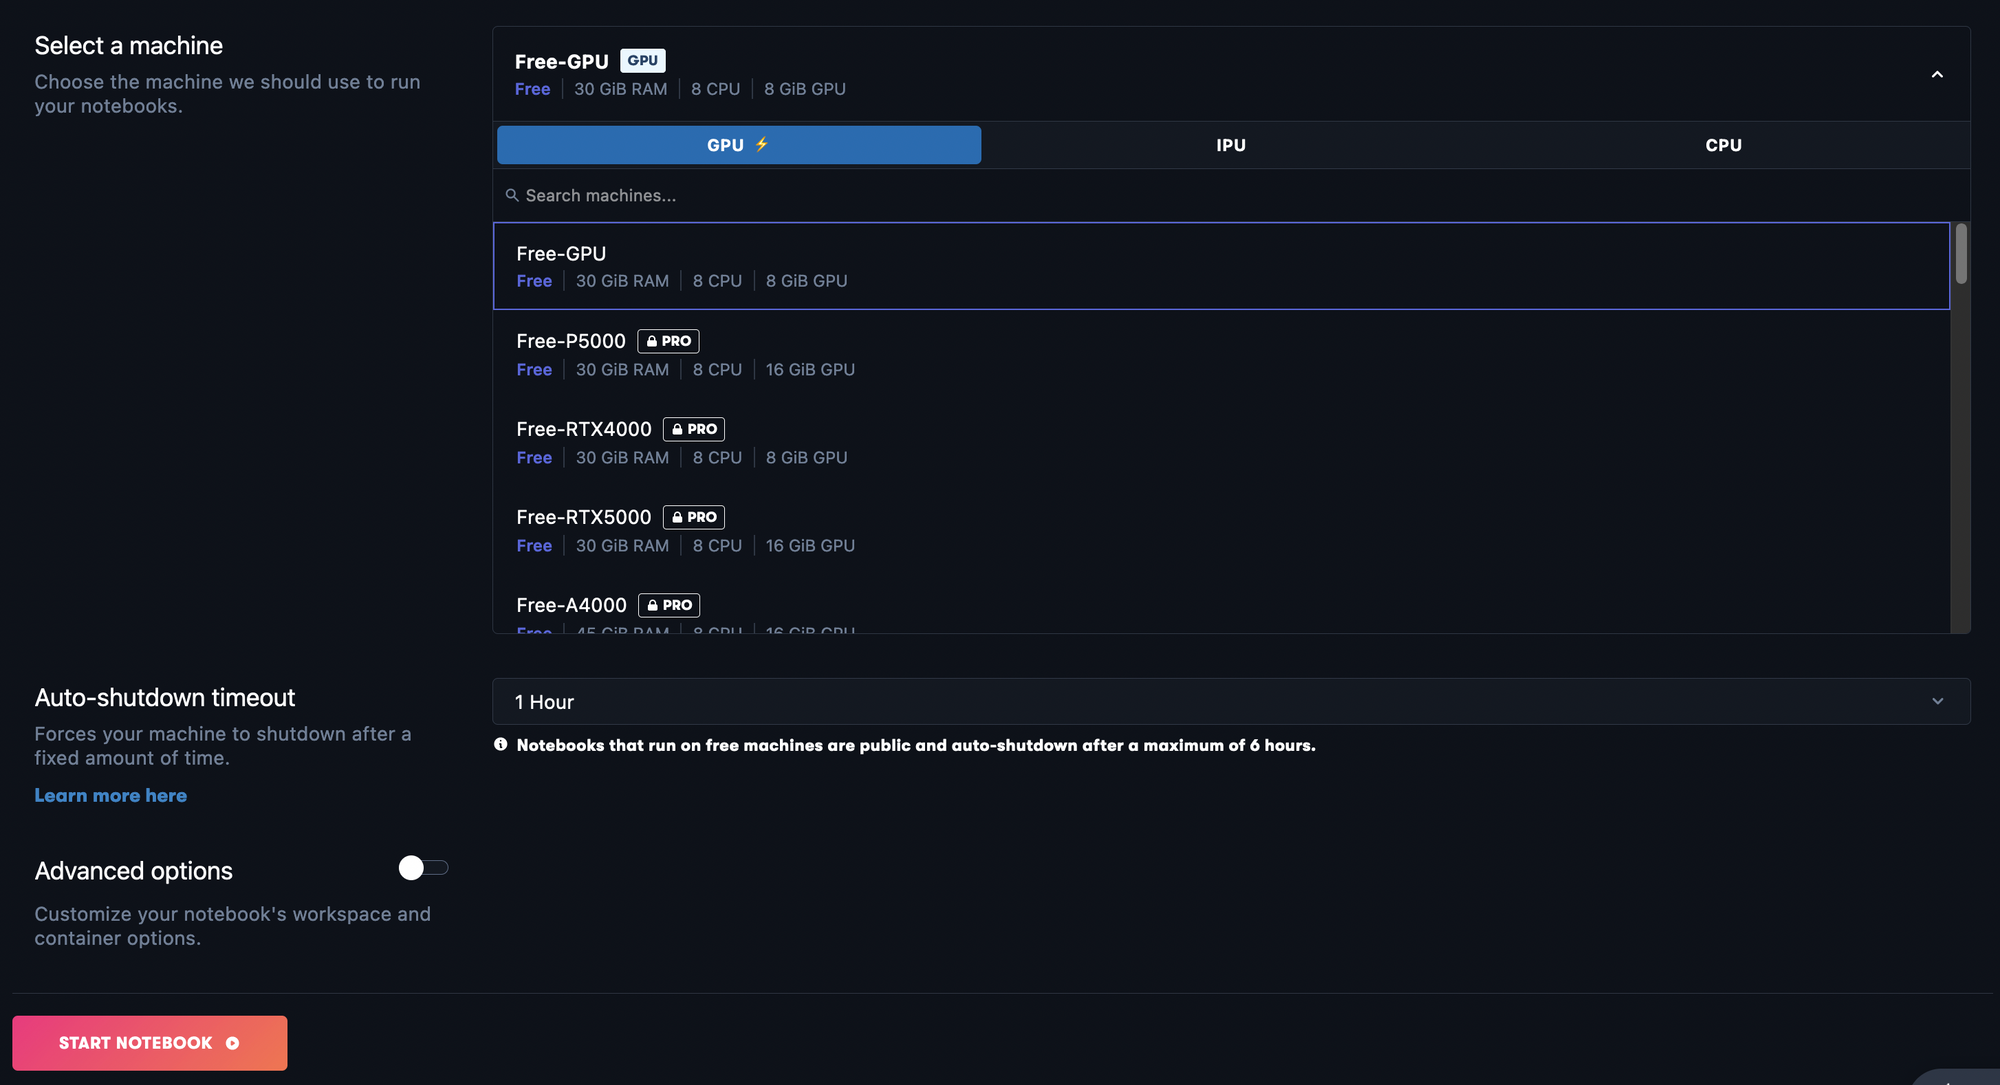
If you see the message "We are currently out of capacity for the selected VM type. Try again in a few minutes, or select a different instance." you have to select "CPU" and then select "Free CPU" as your machine instead.
Once you've got it to work, congrats!
(Not Recommended) The second way to set up a fast.ai environment is to do it locally. I don't recommend this since you'd need to do a lot of setup to get it to work. Not having an Nvidia GPU will make things worse because you can't use CUDA. If you'd like to set it up locally though, you'd need to install anaconda. After installing anaconda, you'd have to open a new terminal, (reopen if it's already opened), and run the following command:
conda install -c fastchan fastai anaconda
Once done, you have to launch a jupyter notebook through anaconda and you're set.
What to do Next?
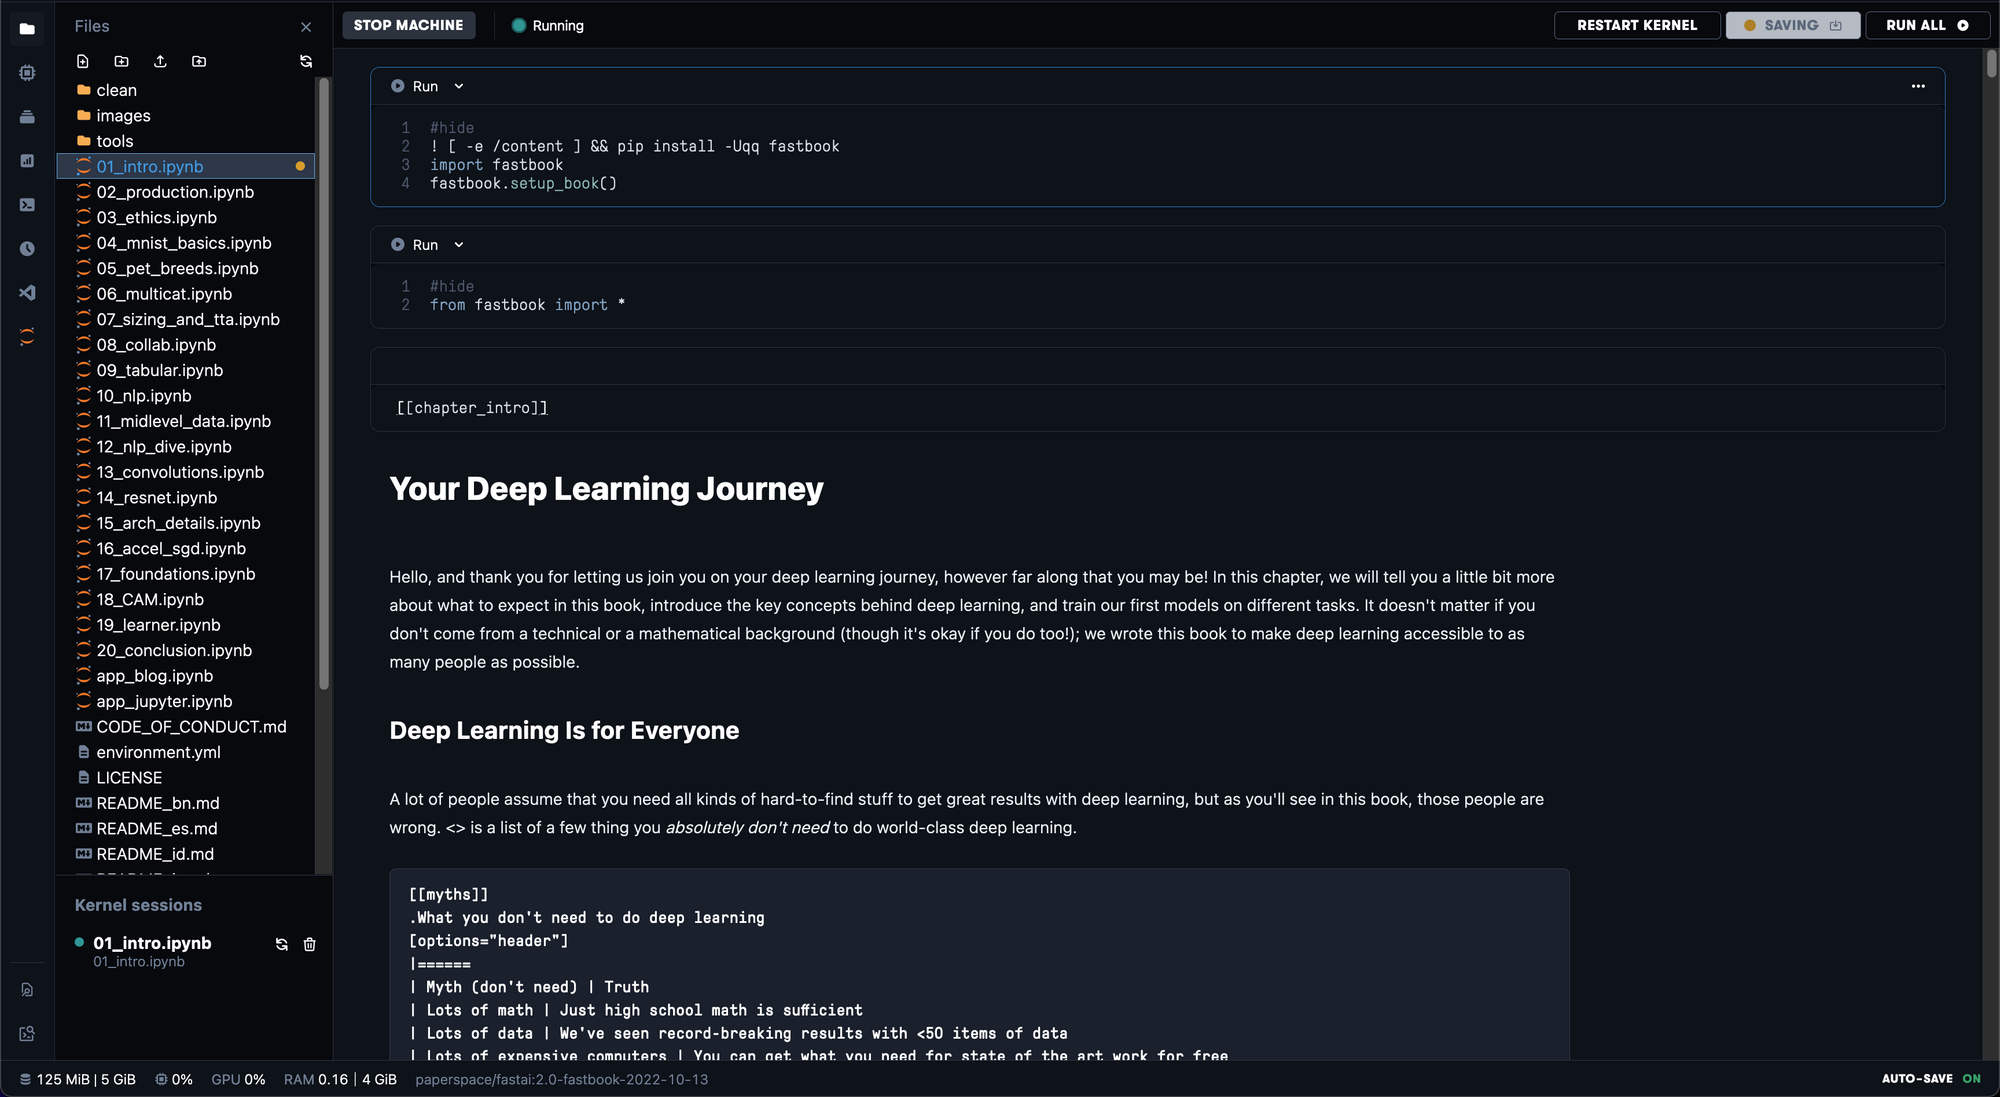
Now that you've got it set up, you can now start with going through the lesson from 01_intro.ipynb. I highly recommend beginners to start with them since these written lessons are concise and easy to understand.
Other Learning Resources
There are also a lot of great learning resources aside from the notebooks above. You can use these as learning aid while going through the jupyter notebooks above. The ones I recommend are the official resources made by the fast.ai creators, Jeremy Howard and Sylvain Gugger.
- Written Article (Planned)
- Official Course: https://course.fast.ai/
- Official Book: https://github.com/fastai/fastbook
- Official Youtube PlayList: https://www.youtube.com/playlist?list=PLfYUBJiXbdtSvpQjSnJJ_PmDQB_VyT5iU
- Official Docs: https://docs.fast.ai/
- Official Paid Book: https://www.amazon.com/Deep-Learning-Coders-fastai-PyTorch/dp/1492045527
Everything in Flutter is a widget. A widget defines how a portion of a screen should look like. Let's take a look at the common UI widgets and how they're used to define how a certain portion of a screen looks like.
Text
A Text widget allows you to display text in your app.
Text('Hello, World!')

You can define how the text looks like by using a TextStyle.
Text(
  'Hello, World!',
  style: TextStyle(
    color: Colors.red,
    fontSize: 48,
    fontWeight: FontWeight.w500, // Medium weight
  ),
)

Container
A Container widget lets you create a rectangular element. It can be decorated to with a BoxDecoration, allowing you to change the color, border radius, etc.
Container(
  height: 100,
  width: 100,
  decoration: BoxDecoration(
    borderRadius: BorderRadius.circular(16),
    color: Colors.blue,
  ),
)

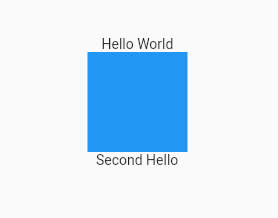
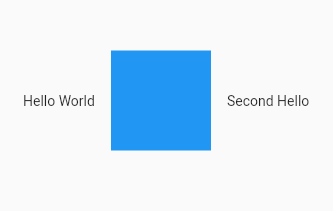
Column
A Column widget allows you to display a list of widgets in a vertical fashion.
Column(
  children: [
    Text('Hello World'),
    Container(
      height: 100,
      width: 100,
      color: Colors.blue,
    ),
    Text('Second Hello'),
  ],
)
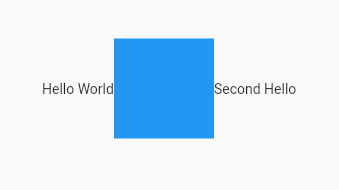
Row
A Row widgets allows you to display a list of widgets in a horizontal fashion.
Row(
  children: [
    Text('Hello World'),
    Container(
      height: 100,
      width: 100,
      color: Colors.blue,
    ),
    Text('Second Hello'),
  ],
)
/
SizedBox
You may have noticed that the widgets inside Column and Row are cramped up. SizedBox is one way of adding spacing between the widgets.
Row(
  children: [
    Text('Hello World'),
    SizedBox(width: 16),
    Container(
      height: 100,
      width: 100,
      color: Colors.blue,
    ),
    SizedBox(width: 16),
    Text('Second Hello'),
  ],
),
Padding
Padding is a way of adding spacing around a widget. Its difference between SizedBox will be discussed below.
Container(
  color: Colors.orange,
  child: Padding(
    padding: const EdgeInsets.all(24),
    child: Container(
      width: 100,
      height: 100,
      color: Colors.blue,
    ),
  ),
),

Padding vs SizedBox
A SizedBox is an invisible box that consumes space based on the width and height values passed to it.
A Padding allows you to add spacing around its child widget. We used Padding in the Padding example because it doesn't force you to constrain the dimensions (the width and height) of its child. It adds the spacing around the child.
ListView
A ListView is very similar to a Column or Row, except it allows you to scroll through its children in the specified direction. By default, the ScrollDirection is set to vertical.
ListView(
  children: [
    Container(
      height: 300,
      width: double.infinity,
      color: Colors.blue,
    ),
    Container(
      height: 300,
      width: double.infinity,
      color: Colors.orange,
    ),
    Container(
      height: 300,
      width: double.infinity,
      color: Colors.green,
    ),
  ],
)

I also recommend trying this interactive example
Icon
An icon just displays an icon. Here's an example:
Icon(Icons.home)
Icons.home is a reference to one of the many icons provided to you by Material Icons.
Similar to Text, an Icon can be styled to your liking:
Icon(
  Icons.home,
  size: 36,
  color: Colors.blue,
)
Button
Buttons in Flutter are pre-configured to look like the buttons defined in the Material Design Specs. Here are the list of different pre-configured buttons in Flutter. The easiest to use is a TextButton, so lets take a look at how to use it.
TextButton(
  onPressed: () {
    print('Button is pressed');
  },
  child: const Text('Press Me'),
),
This ends Part 1 of this series. I hope you learned a lot by reading this article 🙂
Sources
- Listview class Null Safety. ListView class - widgets library - Dart API. (n.d.). Retrieved from https://api.flutter.dev/flutter/widgets/ListView-class.html
- New buttons and Button themes. Flutter. (n.d.). Retrieved from https://docs.flutter.dev/release/breaking-changes/buttons
- Buttons - Material Design. Material design. (n.d.). Retrieved from https://material.io/components/buttons
The List type is one of the most common data types that you will encounter in Dart; therefore, it is crucial to understand when and how to use the methods and properties of a List. I also highly recommend experimenting with List methods in DartPad.
Useful Methods
1. map()
The map() method produces a new list after transforming each element in the list. The following example performs addition to each number in the list.
void main() {
  List<int> numbers = [1, 3, 5];
  var transformedNumbers = numbers.map((number) => number + 2).toList();
  print(transformedNumbers); // Output : [3, 5, 7]
}
* Take note that .map() returns an Iterable so we have to convert it into a List using the .toList() method.
2. forEach()
The forEach() method is very similar to map() except that it doesn't produce a new list after running a function on each element.
void main() {
  List<int> numbers = [1, 3, 5];
  numbers.forEach((number) => print(number + 2));
}
/*
Output:
3
5
7
*/
3. add()
The add() method is used to add an element to the end of a list.
void main() {
  List<int> numbers = [1, 3, 5];
  numbers.add(7);
  print(numbers); // Output : [1, 3, 5, 7]
}
4. removeAt()
The removeAt method removes an element from the list given a position index.
void main() {
  List<int> numbers = [1, 3, 5, 7];
  numbers.removeAt(2);
  print(numbers); // Output: [1, 3, 7]
}
5. where()
The where() method returns a list of elements that satisfy a certain test. Here's an example of a test that checks if a number is divisible by 2.
void main() {
  List<int> numbers = [1, 4, 7, 10, 11];
  var evenNumbers = numbers.where((number) => number % 2 == 0).toList();
  print(evenNumbers); // Output: [4,10]
}
* Take note that .where() returns an Iterable so we have to convert it into a List using the .toList() method.
6. firstWhere()
The firstWhere() method is very similar to where() except that it returns only the very first element that satisfy the test.
void main() {
  List<int> numbers = [1, 4, 7, 10, 11];
  var evenNumber = numbers.firstWhere((number) => number % 2 == 0);
  print(evenNumber); /// Output: 4
}
7. any()
The any() method returns true if at least one element satisfies the condition.
void main() {
  const items = ['Beef', 'Broccoli', 'Banana'];
  if (items.any((item) => item.contains('a'))) {
    print('At least one of the elements contain the letter "a"');
  }
  //Output: At least one of the elements contain the letter "a"
}
8. every()
The every() method returns true only if all of the elements satisfy the condition.
void main() {
  const items = ['Beef', 'Broccoli', 'Banana'];
  if (items.every((item) => item.contains('a'))) {
    print('All elements contain the letter "a"');
  }else{
    print('Not all elements contain the letter "a"');
  }
  // Output: Not all elements contain the letter "a"
}
Useful Properties
1. length
The length property returns the length of a list.
void main() {
  List<int> numbers = [72,243,859];
  print(numbers.length); // Output: 3
}
2. first
The first property returns the first element in the list.
void main() {
  List<int> numbers = [72,243,859];
  print(numbers.first); // Output: 72
}
3. last
The last property returns the last element in the list.
void main() {
  List<int> numbers = [72,243,859];
  print(numbers.last); // Output: 859
}
4. isEmpty
The isEmpty property returns true if the list has no elements.
void main() {
  List<int> numbers = [];
  print(numbers.isEmpty); // Output: true

  numbers.add(34); // Add an element in the list
  print(numbers.isEmpty); // Output: false
}
5. isNotEmpty
The isNotEmpty property returns true if the list has at least one element.
void main() {
  List<int> numbers = [72,243,859];
  print(numbers.isNotEmpty); // Output: true

  numbers.clear(); // Removes all elements in the list
  print(numbers.isNotEmpty); // Output: false
}
Bonus
List.of()
The List.of() method creates a new list containing all of the elements from an existing list. To understand why we need to create a new list, take a look at the following scenario:
void main() {
  List<int> oldNumbers = [1, 2, 3];
  var newNumbers = oldNumbers;
  newNumbers.add(4);
  print(oldNumbers); // Output: [1,2,3,4]
}
The following code, var newNumbers = oldNumbers, creates a reference to the oldNumbers list. This is why when we added a number to newNumbers, that number is added to oldNumbers. In this scenario, both newNumbers and oldNumbers are referencing the same instance of a list.
Solution:
By making sure that newNumbers is referencing a new list, any changes to newNumbers will not affect oldNumbers.
void main() {
  List<int> oldNumbers = [1, 2, 3];
  var newNumbers = List<int>.of(oldNumbers);
  newNumbers.add(4);
  print(oldNumbers); // Output: [1,2,3]
  print(newNumbers); // Output: [1,2,3,4]
}
Best practices:
- Specify the List type like the example above instead of using
List.of(oldNumbers)to implicitly set the type of the new list - Use
List.ofinstead ofList.from. See why and a possible bug that can occur when usingList.from.
Sources
- List class null safety. List class - dart:core library - Dart API. (n.d.). Retrieved from https://api.flutter.dev/flutter/dart-core/List-class.html
- ITERABLE collections. Dart. (n.d.). Retrieved from https://dart.dev/codelabs/iterables
Data types are the building blocks of every programming language. In Dart, a data type is a variable that holds a value. It's very similar to the variables in math. Think about the x variable in math. x can be a representation of a certain value - a number. In Computer Science, that certain value can represent a lot more things than a number; the value can be a text, the value can be either true or false, or it can represent other values. Let's take a look at the syntax of declaring variables in dart:
(Data Type) (Variable Name) = Value;

    int          age        =  100;
     ^            ^             ^
     |            |             |
(Data Type) (Variable Name) = Value;

Examples:

bool isSmart = true;
String message = "Hello World";
double pi = 3.14;
Let's take a look at the most commonly used data types in Dart. Try them out in DartPad.
Boolean
A boolean is a data type that can hold either one of the following values - true or false. It's usually used in conditional statements. The boolean type is denoted by the shortcut bool.
Example usage:
void main() {
  bool isRaining = true;

  if (isRaining) {
    print("It's currently raining.");
  } else {
    print("It's not raining right now.");
  }
}
String
A string is a data type that represents a bunch of text. In dart, it holds a sequence of UTF-16 code units. You can use single or double quotes to create a string:
void main() {
  String message = "Hello World";
  print(message);
}
Integer
An integer is a data type that represents a whole number. In dart, the integer is 64-bit. The integer type is denoted by the shortcut int.
Example usage:
void main() {
  int x = 4;
  int y = 3;
  print(x + y);
}
Double
A double is a data type that can represent numbers with decimals.
Example usage:
void main() {
  double x = 3.85;
  double y = 2.18;
  print(x + y);
}
Lists
A list is a data type that can represent a list of variables. The list type is denoted by the shortcut List<T>, where T is a data type. If I want to represent a list of integers, the list type should be denoted as List<int>.
Example usage:
void main() {
  List<int> numbers = [1, 3, 5, 7, 9, 11];
  int total = 0;
  for (int number in numbers) {
    total+=number;
    // total+=number; is a shortcut for total = total + number;
  }
  print(total);
}
It is also possible to access the element of a list using list[index], where index is the (n-1)th element of the list. For example, if I want to access the 1st element of the list, I would do so using list[0], and if I want to access the 2nd element of the list, I would do so using list[1]. Note that index starts at 0 instead of 1.
Example usage:
void main() {
  List<int> numbers = [1, 3, 5];
  print(numbers[0]); // Output : 1
  print(numbers[1]); // Output : 3
  print(numbers[2]); // Output : 5
}
Map
A map is a data type that holds key-value pairs.
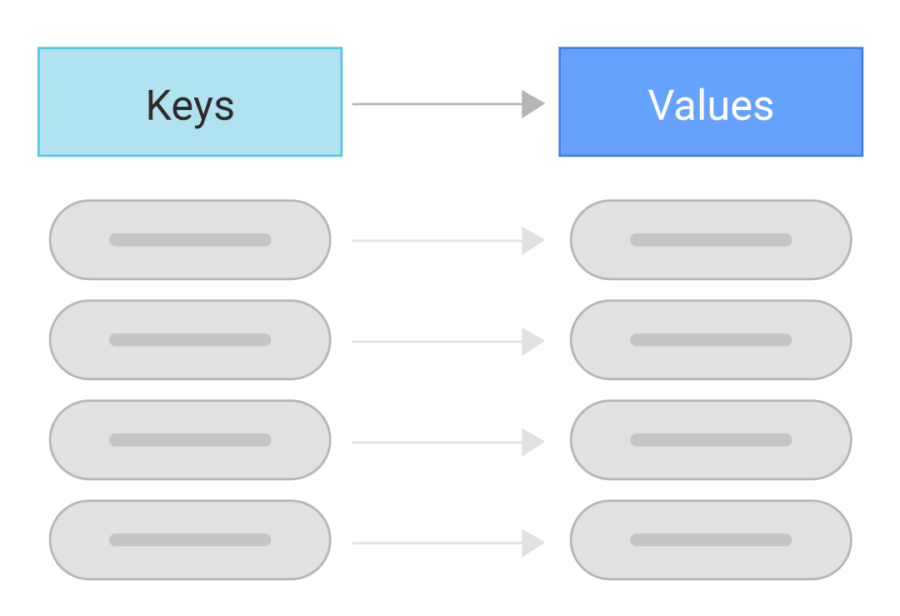
Maps allows you to quickly lookup a certain value by referencing its key. The syntax is as follows: map["key"]
For example:
void main() {
  Map<String, String> user = {
    "firstName": "Bill",
    "lastName": "Gates",
    "username": "BGates",
  };

  print(user["firstName"]); // Output: Bill
  print(user["lastName"]); // Output: Gates
  print(user["username"]); // Output: BGates
}
Sources:
- Dart programming language. (n.d.). Retrieved from https://dart.dev/
- The Dart Type System. (n.d.). Retrieved from https://dart.dev/guides/language/type-system
- Int class. dart. (n.d.). Retrieved from https://api.dart.dev/stable/2.6.1/dart-core/int-class.html
- Alastairn. (2023, August 15). What is a Key Value Database? Definition & FAQs | ScyllaDB. ScyllaDB. https://www.scylladb.com/glossary/key-value-database/

Flutter is an open source framework made by Google. It enables a developer to create native cross-platform apps from a single codebase. This means that you can develop Android, iOS, Web, and Desktop apps at the same time in a single codebase. Flutter is mainly used for developing mobile apps but its use can be extended to developing web and desktop apps.
Flutter Installation
Important: If you’re installing on Apple Silicon (M1 Chips and M2 Chips), you need to have the Rosetta translation environment. You can install this manually by running:
sudo softwareupdate --install-rosetta --agree-to-license
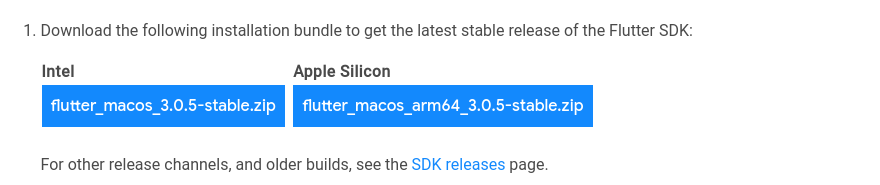
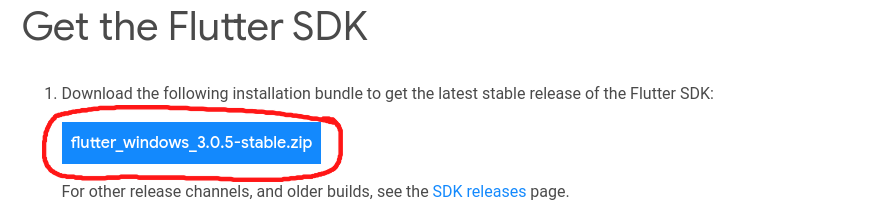
- Download the Flutter SDK from the installation page. If your mac uses
M1orM2related chips, download the Apple Silicon version. However, if your mac usesIntel x86chips, download the Intel version.
- Extract the files to your Documents folder; it should be located in
/Users/YourUsername/Documents.
Update your Path
- Open your terminal and run the following command to determine whether you're using
bashorzsh:
echo $0
- If the output is
bash, add flutter to your path by running the following command:
echo 'export PATH="$PATH:$HOME/Documents/flutter/bin"' >> .bashrc
- If the output is
zsh, add flutter to your path by running the following command:
echo 'export PATH="$PATH:$HOME/Documents/flutter/bin"' >> .zshrc
Verifying the Configuration
We have to make sure that Flutter has been configured correctly.
- Open a new terminal (Make sure you open a new terminal after adding Flutter to your PATH)
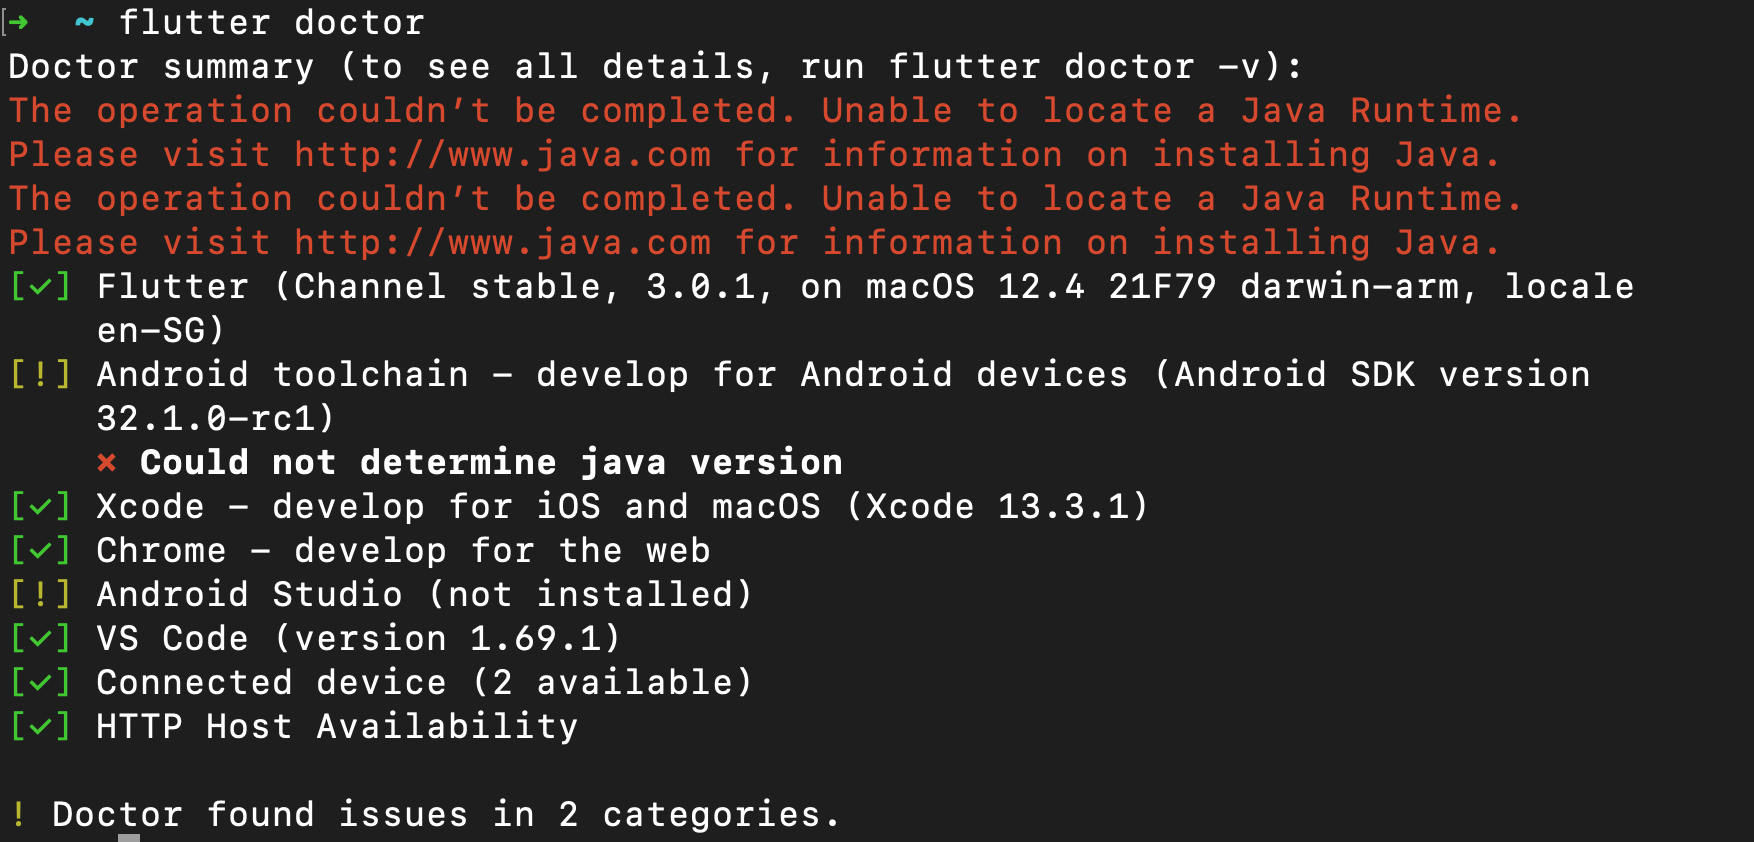
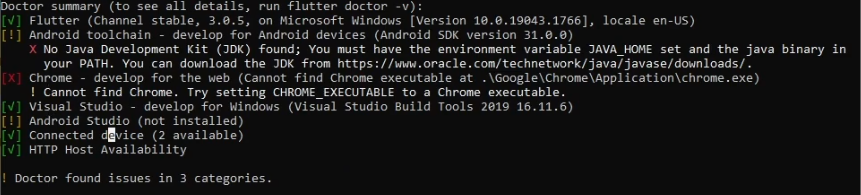
- Run
flutter doctorin your terminal.
If the command successfully runs, it will look similar to this:
Android Setup
- Download and install Android Studio.
- Start Android Studio, and go through the ‘Android Studio Setup Wizard’. This installs the latest Android SDK, Android SDK Command-line Tools, and Android SDK Build-Tools, which are required by Flutter when developing for Android.
- Run
flutter doctorto confirm that Flutter has located your installation of Android Studio. If Flutter cannot locate it, runflutter config --android-studio-dir <directory>to set the directory that Android Studio is installed to.
Android Virtual Emulator Setup
- Enable VM acceleration on your machine.
- Launch Android Studio, click the AVD Manager icon, and select Create Virtual Device.
- In older versions of Android Studio, you should instead launch
Android Studio > Tools > Android > AVD Managerand select Create Virtual Device. (The Android submenu is only present when inside an Android project.) - If you do not have a project open, you can choose
Configure > AVD Managerand select Create Virtual Device. - Choose a device definition and select Next.
- Select one or more system images for the Android versions you want to emulate, and select Next. An
x86orx86_64image is recommended. - Under Emulated Performance, select
Hardware - GLES 2.0to enable hardware acceleration. - Verify the AVD configuration is correct, and select Finish.
For details on the above steps, see Managing AVDs.
Agree to Android Licenses
- Run
flutter doctor --android-licensesto agree to the licenses - Type
yfor every license agreement that shows up - If it shows an error, you have to install the android sdk command line tools
- Open Android Studio, click on
More Actions>SDK Manager>SDK Toolsand click on thecommand-line toolscheckbox. - Click
Applyand wait for it to install. - Run
flutter doctor --android-licensesto agree to the licenses
VS Code Setup
- Download and install VS Code
- Once it is opened, open the extensions tab and install the Flutter extension
- Open the Command Palette by pressing
Ctrl + Shift + P. - Type
New Projectand selectFlutter: New Project - Select
Applicationand type any project name - Select a folder to create the project in and you're ready to go!

Flutter is an open source framework made by Google. It enables a developer to create native cross-platform apps from a single codebase. This means that you can develop Android, iOS, Web, and Desktop apps at the same time in a single codebase. Flutter is mainly used for developing mobile apps but its use can be extended to developing web and desktop apps.
Flutter Installation
Install Flutter
- Download the Flutter SDK from the installation page.
2. Extract the files to your Documents folder; it should be located in C:\Users\YourUsername\Documents.
Update your Path
- Open your search bar and type
env. Click on Edit environment variables for your account. UnderUser variablescheck if there is an entry called Path. - Click on Path, then click on Edit.
- Click on New and add the following to your Path:
C:\Users\ReplaceThisWithYourUsername\Documents\flutter\binVerifying the Configuration
We have to make sure that Flutter has been configured correctly.
Open a new terminal and run flutter doctor. *Make sure that you opened a new terminal.
If the command successfully runs, it will look similar to this:
Android Setup
- Download and install Android Studio.
- Start Android Studio, and go through the ‘Android Studio Setup Wizard’. This installs the latest Android SDK, Android SDK Command-line Tools, and Android SDK Build-Tools, which are required by Flutter when developing for Android.
- Run
flutter doctorto confirm that Flutter has located your installation of Android Studio. If Flutter cannot locate it, runflutter config --android-studio-dir <directory>to set the directory that Android Studio is installed to.
Android Virtual Emulator Setup
I highly recommend following the Video Version for this part
- Enable VM acceleration on your machine.
- Launch Android Studio, click on
More Actions>Virtual Device Manager>Create Virtual Device>Pixel 3a>Next>Next>Finish
For details on the above steps, see Managing AVDs.
Agree to Android Licenses
- Run
flutter doctor --android-licensesto agree to the licenses - Type
yfor every license agreement that shows up - If it shows an error, you have to install the android sdk command line tools
- Open Android Studio, click on
More Actions>SDK Manager>SDK Toolsand click on thecommand-line toolscheckbox. - Click
Applyand wait for it to install.
VS Code Setup
- Download and install VS Code
- Once it is opened, open the extensions tab and install the Flutter extension
- Open the Command Palette by pressing
Ctrl + Shift + P. - Type
new projectand selectFlutter: New Project - Select
Applicationand type any project name - Select a folder to create the project in and you're ready to go!

Git and Github are the most essential tools in a developer’s arsenal. Git allows you to track every change you’ve made in the codebase while Github simplifies project management and collaboration.
People who are new in programming often get confused by the difference between Git and Github. A common misconception is that these tools do the same thing. To add up to the confusion, many software developers often interchange Git and Github in conversations even if each tool serves a different purpose. So why are they often mentioned together and what makes them so similar?
Table of Contents
- What is Git
- What is Github
- Create a Github Account
- Git Installation
- Git Configuration
- Create a Github Repository
What is Git?
Git is a version control system created by Linus Torvalds. A version control system records all the changes made to a set of files. By doing so, it enables us to track and manage the changes made to these files. Since Git keeps track of a certain file’s full history, it can be used to recall older versions of the code or it can be used to restore the older version of a file. One thing to keep in mind is that Git is installed in a local machine. Therefore, once the hard drive in a local machine fails, all the files and its recorded changes are lost. This limitation can be solved by using a Git hosting service like Github.
What is Github?
Github is a cloud-based hosting service that makes it easy to manage Git repositories. By uploading the files tracked by Git to the cloud, you don’t have to worry about losing any file when your hard drive fails. Another advantage Github provides is ease of collaboration. Once a fellow developer is finished with his work, he can make a pull request or push a commit to update the codebase with his changes.
Create a Github Account
To get started using Github, we have to create an account. Head on over to https://github.com/signup and enter your desired username, email, and password. After that, you’ll be greeted with a welcome page.
Git Installation
Windows
We can install Git in Windows by downloading the installer from their website. Once you're greeted by the installer, you might get overwhelmed by the amount of customizable settings. Don't worry about this :) The default settings are good! Just keep on clicking next until Git is installed.
Mac
It’s best to install Git using a package manager like brew. To install brew, run the following command:
/bin/bash -c "$(curl -fsSL https://raw.githubusercontent.com/Homebrew/install/HEAD/install.sh)"
After installing brew, installing Git is as easy as running:
brew install git
Linux
It's very convenient to install Git in Linux. Depending on your Linux distribution, you’d have to run different commands:
Debian-based distros (Ubuntu)
sudo apt update && sudo apt install git
Fedora-based distros
sudo dnf -y update && sudo dnf -y install git
Arch-based distros (Manjaro)
sudo pacman -Sy install git
Git Configuration
In order to use Git, you need to set a name and email:
git config --global user.name “ReplaceMeWithYourGithubUsername”
We should use the private email provided by Github when setting the email. You can find your private email by going to your email settings. (The highlighted text is the private email.)

git config --global user.email “ReplaceMeWithYourPrivateGithubEmail”
Create a Github Repository
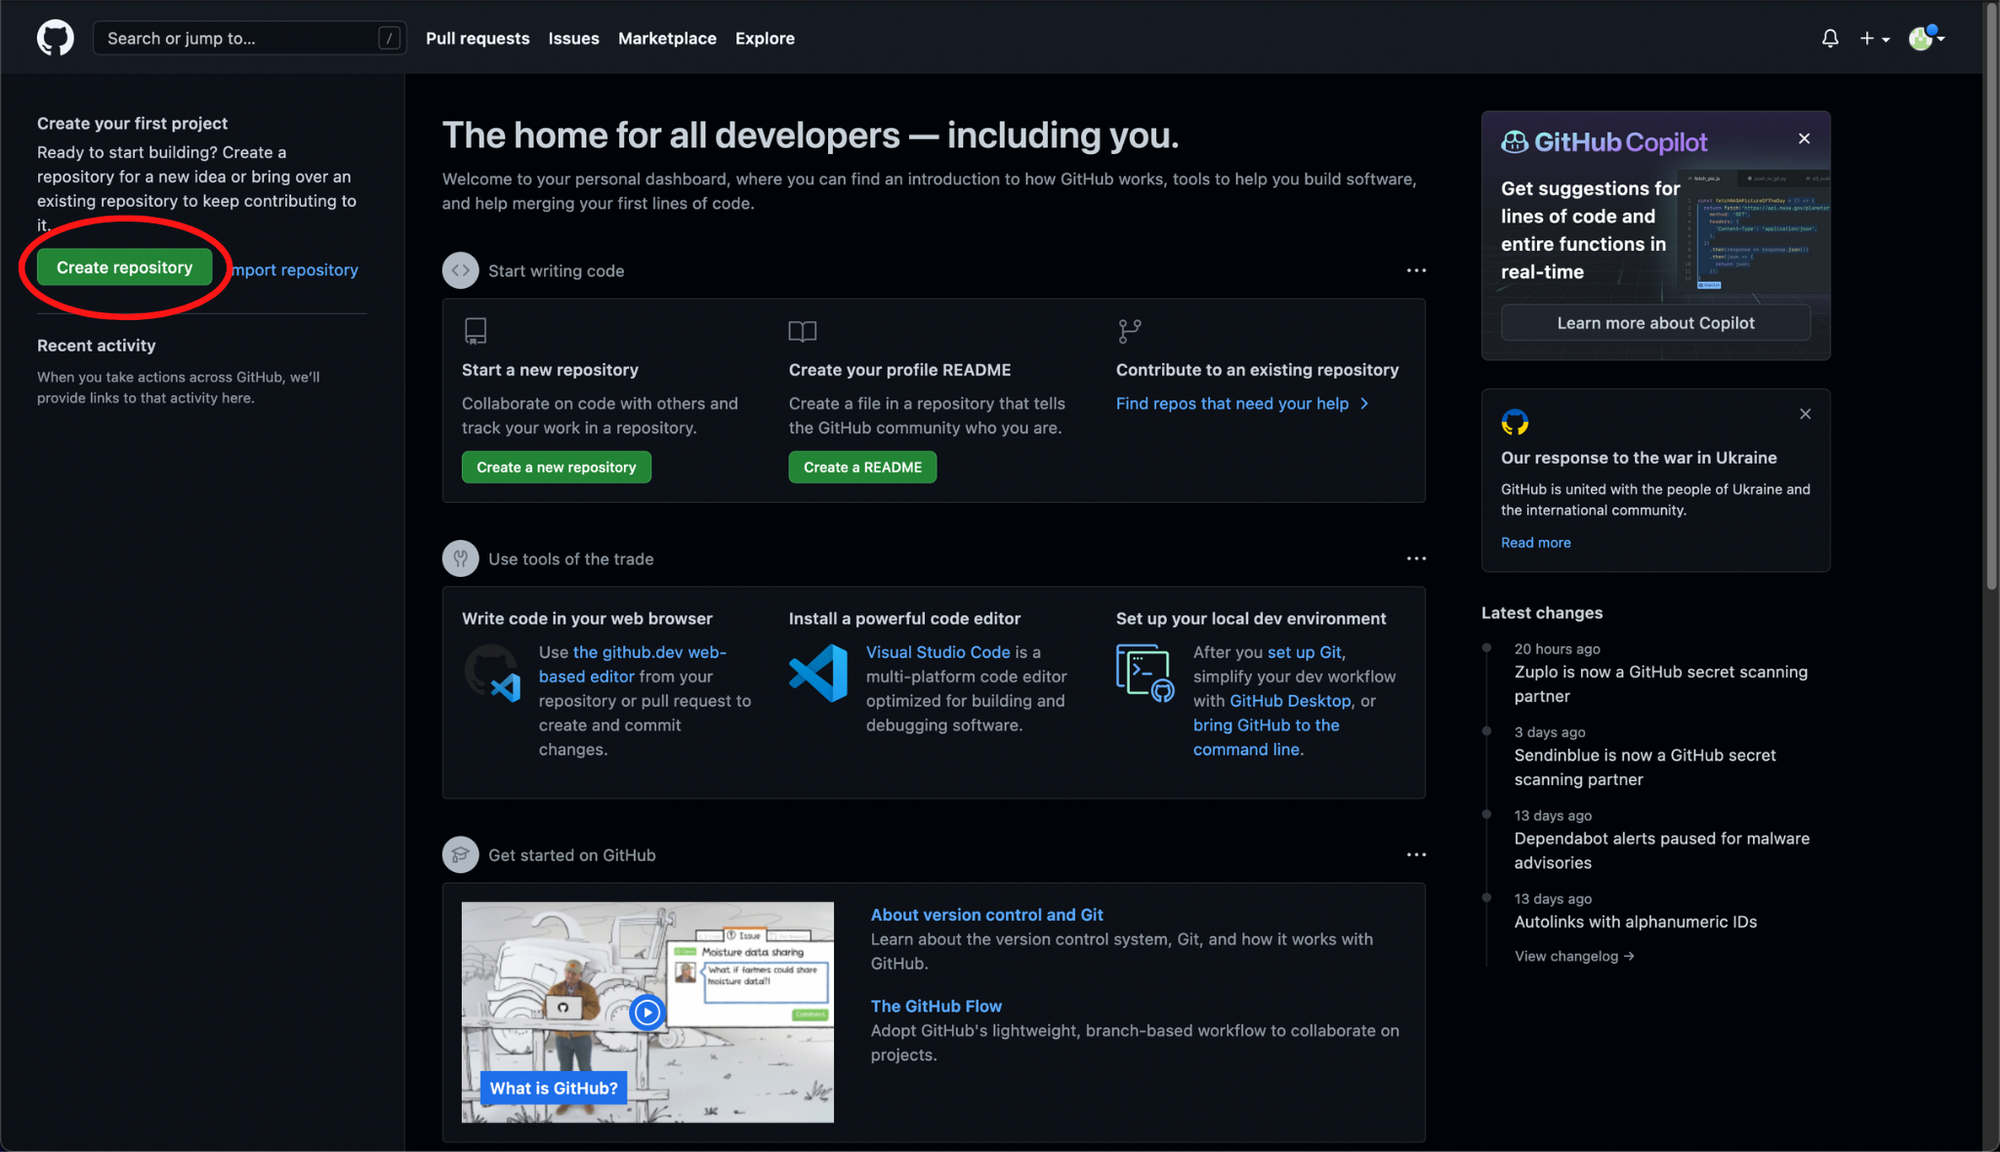
To create a Github repository, head on over to Github and click on the "Create Repository" button.
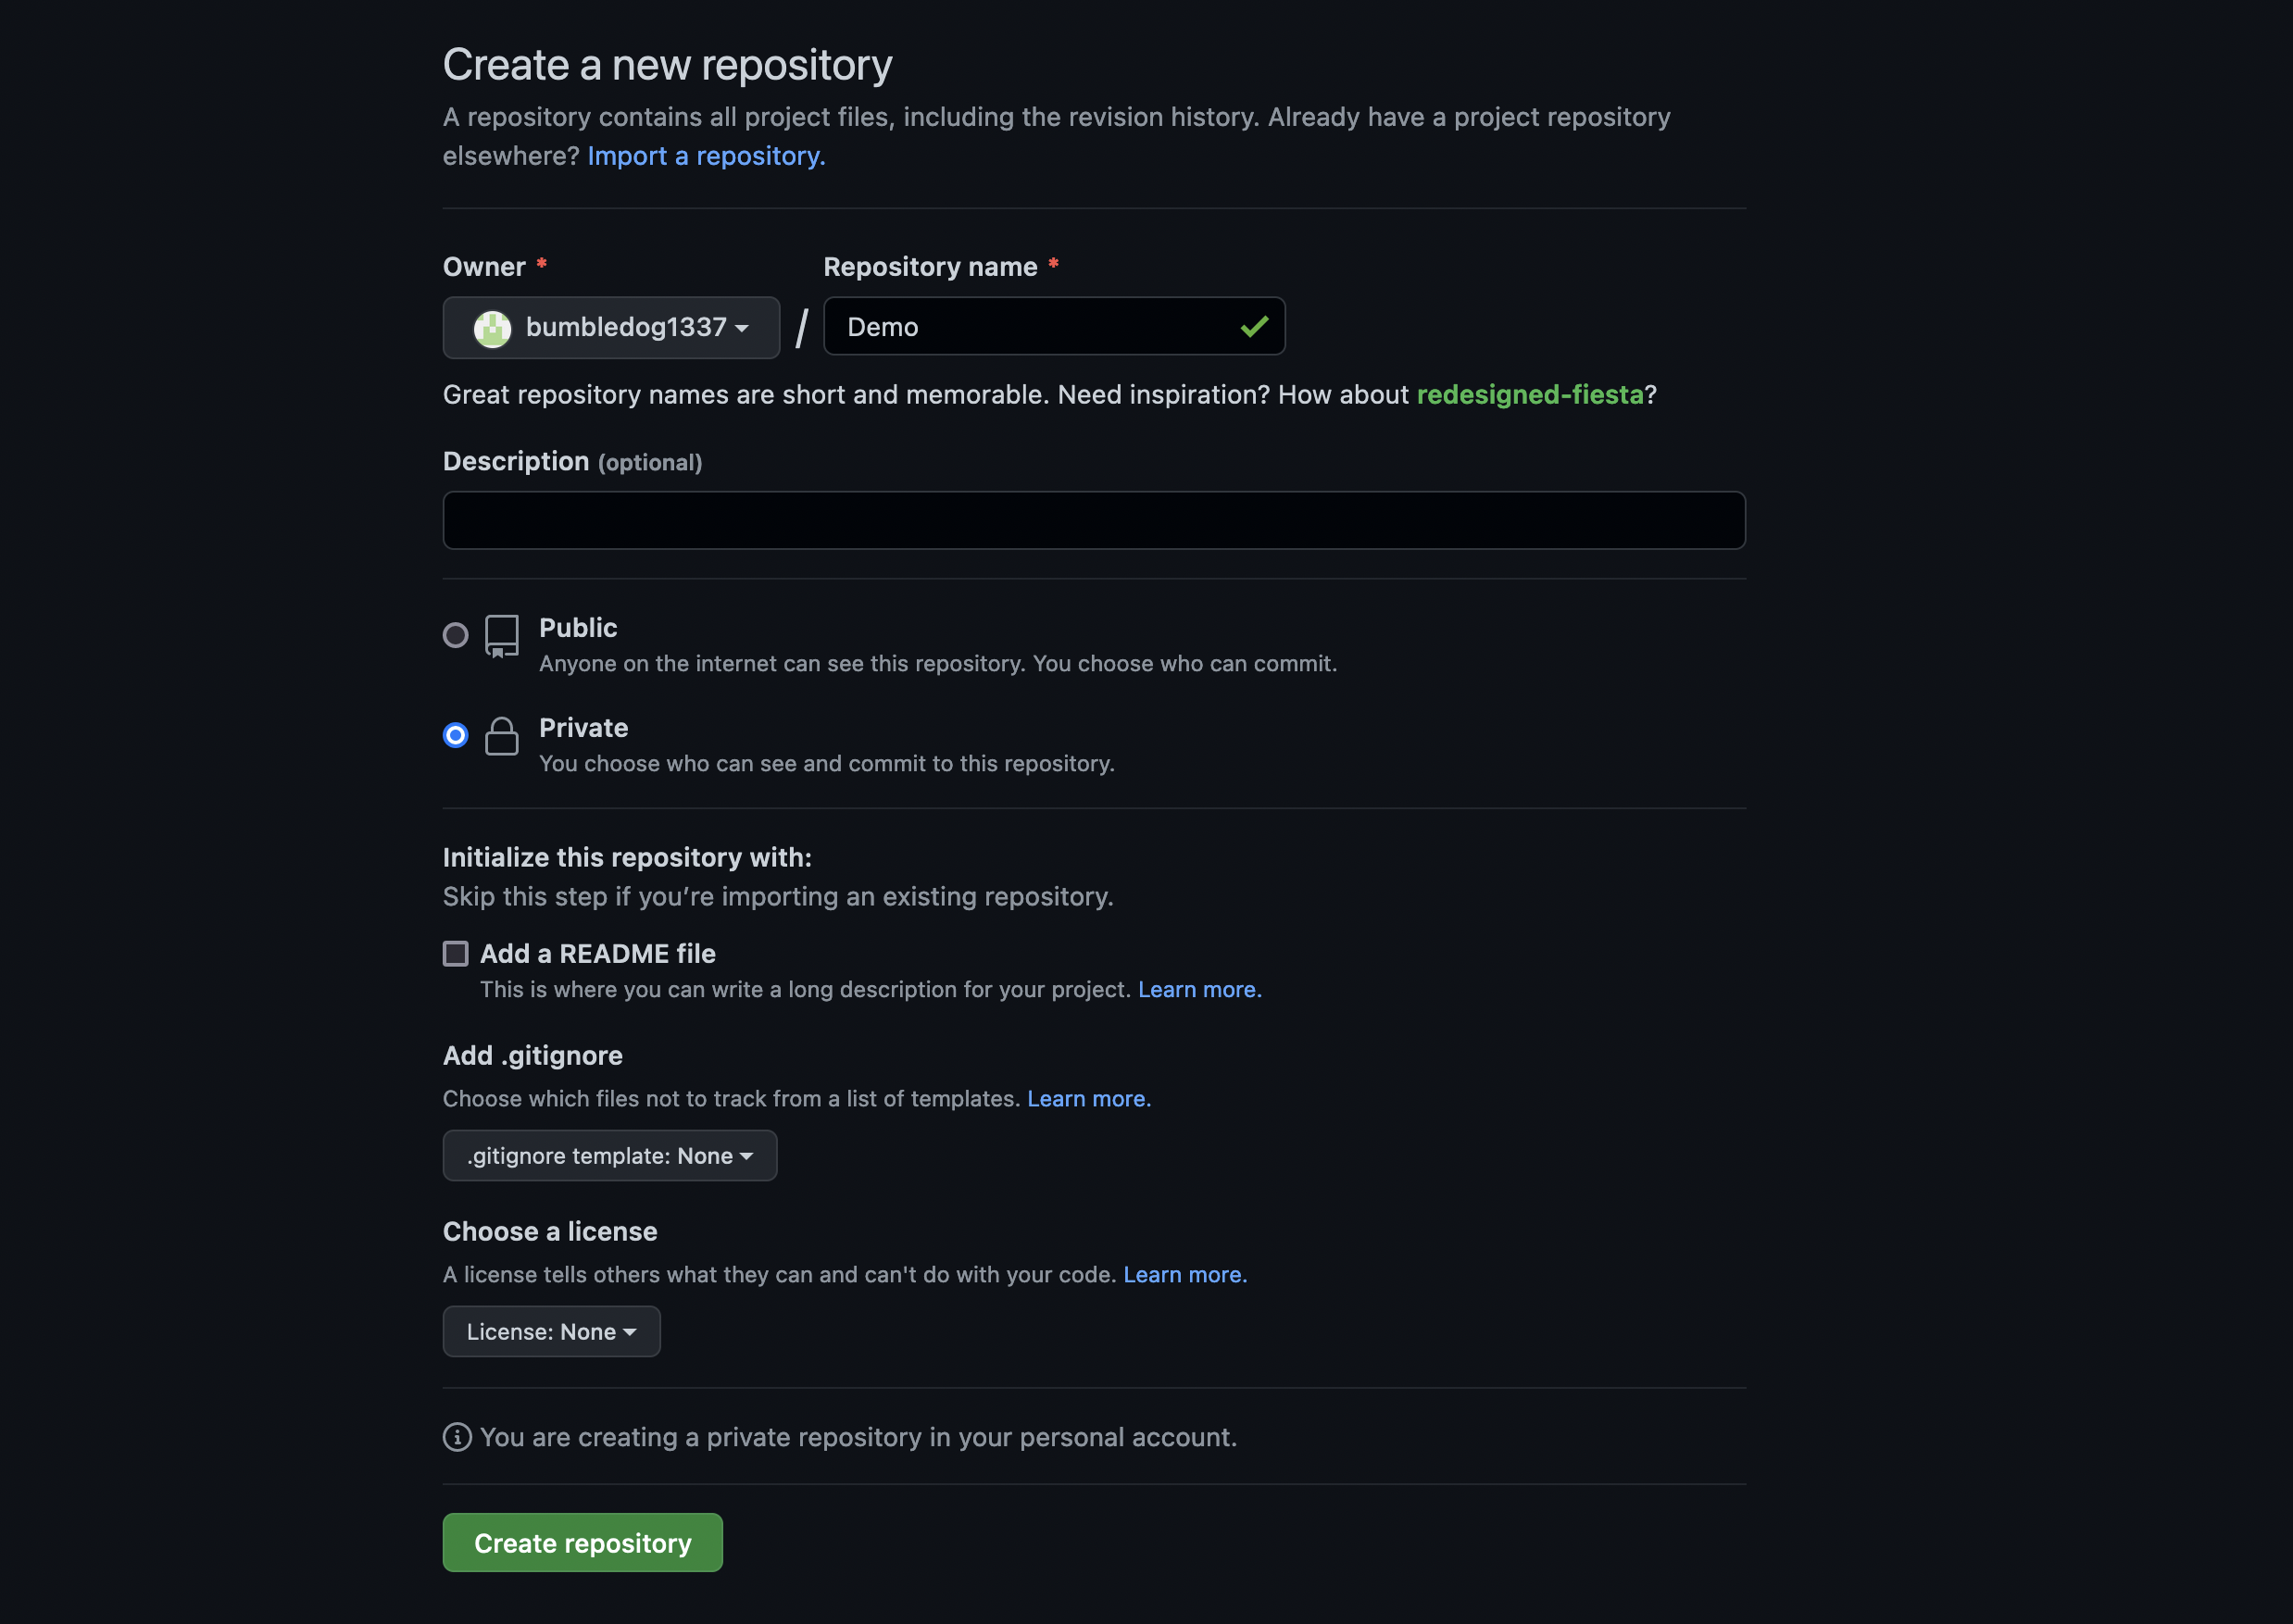
You can set any name for the repository and set the repository's visibility to public or private - these settings are up to you.
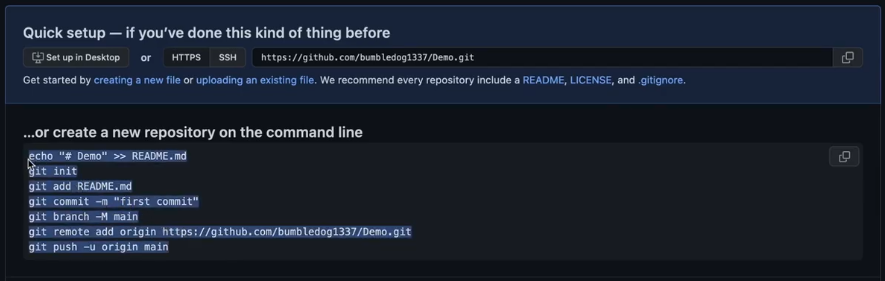
Once you've created the Github repository, you'll be greeted by a getting started page. This quick setup page can seem quite intimidating at first - but don't worry! All you have to do is copy the lines of code under the "...or create a new repository on the command line" section.
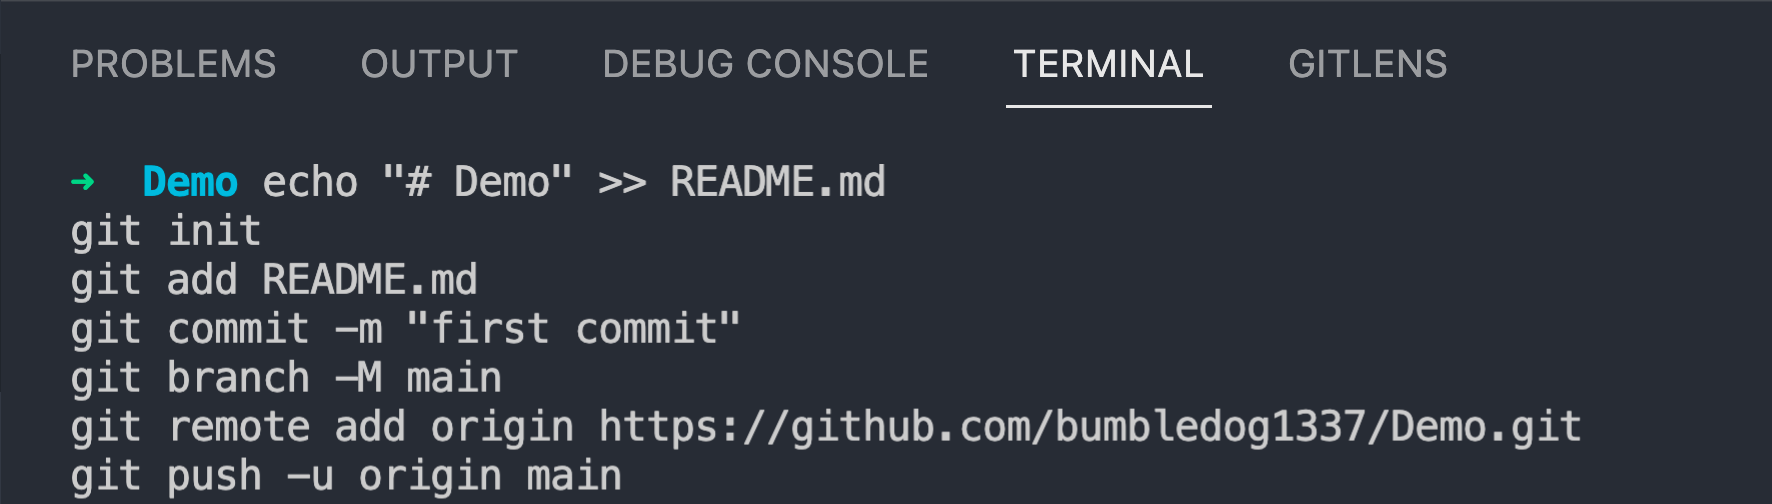
After copying, open your code editor. In my case, it is Visual Studio Code. Open a folder if you haven't already and open the terminal in the same directory as the folder. (In VS Code, this can be done by opening a folder and clicking on Terminal > New Terminal in the menu bar.) Paste the copied lines of code and hit enter.
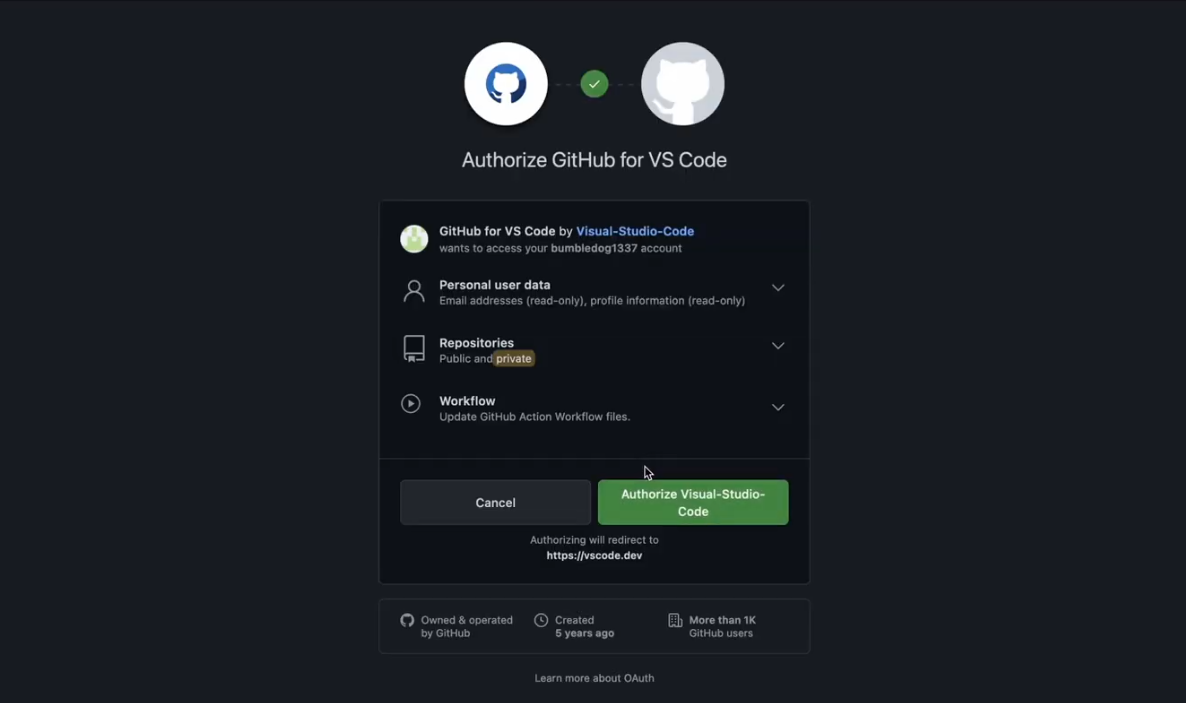
Your code editor will ask you to if they can sign in using Github. Click on allow and authorize it's sign in.
You'll be redirected to your code editor annndddd congratulations! You've successfully configured Git and Github. Looking forward to your journey as a software engineer.
]]>